Category Archives: Research – General

Revisiting My Roots: My System

As I work through my work from when I was a “baby genealogist,” I’m doing a ton of clean up. I may have written about parts of this before, but I’m going to break down the steps I’m taking to bring my previous research up to the standards I have today. This might sound like a lot of busywork but it is actually quite fun, enlightening, and satisfying to revisit old research.

I have found several errors. Many just errors from not knowing what I was doing early on. Some errors involving attaching the wrong people to the tree or trusting those who researched before me to have analyzed the records fully. And I don’t mean for that to sound as harsh as it probably does. I just mean that none of us know what we are doing when we start out. And as a “baby genealogist,” I didn’t know to not blindly trust what others shared with me. They likely didn’t know any better either… and that’s just how it is, but that’s also how mistakes get made and perpetuated.

But I digress…

As I have been doing this work to clean up my old research, I have found myself following a series of steps. These steps may help you, they may be completely useless to you, but maybe you’ll find a nugget or develop your own series of steps. I am working to mirror my physical binders and my digital folders. Personally, I think this is a good way of ensuring that my research may be preserved. If the binders are well organized and understandable, then my kids are more likely to look at them. I’m not certain my digital items on my laptop, or my genealogical software might make it. My Ancestry tree may. Be sure to set up a “Legacy Contact” person who can take over after your unfortunate demise. (Sorry, did that sound too ominous?) This can be found in your Account Settings.

My current steps, usually in this order, but not necessarily:

  • Choose a binder.
  • The main section should be the couple of that generation. The back is divided for sections for each child (except the one I descend through, they have their own binder). (More on this can be found in a previous blog series.) Make sure there are tabs that label each child’s section.
  • Open my Reunion file. Reunion (and other programs probably) gives each source a unique number. I use this number to label my paper files. This allows me to look sources up by number, but also tells me that that physical source has been entered in my Reunion file. I just write that number on a little sticker (like a garage sale price tag type of sticker) and put it on the upper right corner of the printed document.
  • I have been writing citations for a long time for each of my documents. However, as my understanding of sources and as the genealogical industry grows and evolves, so do my citation styles. So, I next look at the previous citation and update it if necessary. My system for storing the citations has changed over time as well. I do what I call “Touch it Once Citations” where I only write a citation once and then it’s just copy/paste for any articles or blog posts I write that require a citation. I have now added a column to store that Reunion source number. Adding this number tells me that I’ve updated the citation to today’s standards and have added it to Reunion.
  • Once all of the existing documents have been checked, sources updated and logged, I then start picking up any “low-hanging fruit” for the couple and their children. Things like census records I hadn’t gathered yet (in many cases the 1940 and 1950 census weren’t around when I was working on some of these), newspapers and vital records that are now available online. Anything easy that wasn’t easy when I started. And mostly I’m just getting the basics on the children that are not my direct line.
  • For these new sources, downloading them to my computer, writing the citations, entering them in Reunion, adding them to my Ancestry tree, printing them and putting them in the correct location in the binder. I am also labeling the digital files in a way that mirrors my binder system. (Again visit my binder series for details.) I’m adding the source number to the page and putting them in the binder.

Those are the main steps I’m taking right now. I manage to work on this a couple of hours per week around my other life responsibilities.

Once I’m caught up on all of this clean-up I have other steps I plan to take such as:

  • Transcribing documents. Kids these days (‘get off my lawn!’) can’t read cursive… many adults can’t read old or messy cursive.
  • Writing up short biographical sketches that put into narrative form the documents in the binders, a TLDR if you will.
  • Clearing out any old photo copies of indexes, pedigree charts shared with me from other researchers, copies I made from books when I wasn’t sure if it were my family or not, etc. My binders have collected a lot of “chaff” over the years. I need to go through it and clear those out if possible.
  • Updating pedigree charts and family group sheets that I put on the front and back of the binders as kind of a road map to what’s inside.

I hope that gives you some insight into how I’m doing my “baby genealogy” clean-up. And I hope it gives you some ideas on how to handle yours if you’re so inclined. You may decide that you don’t want paper binders. That’s ok. You do you! It’s less stuff to go in the dumpster when the kids take over, that’s for sure. I’m hoping the physical papers will spark interest in my kids. Time will tell.

Adopted Ancestor – Elizabeth Birdwistle

Sometimes, when I want to learn more about a database, like what kind of information it is going to return, I’ll so a search for a name. Any random name will do. But I get tired of “John Smith.” Why does it always have to be a man anyway? So, I’ve gotten into the habit of being a bit more creative with the names I use.

I was doing some research on the different migration groups into Canada and happened upon the British Home Children. England developed a system of shipping orphaned or poor children to Canada to find them homes with families. Similar to the Orphan Train system that happened in the U.S. Some of the children found themselves in good homes and were treated like part of the family, and others, not so much, being treated more like servants or worse.

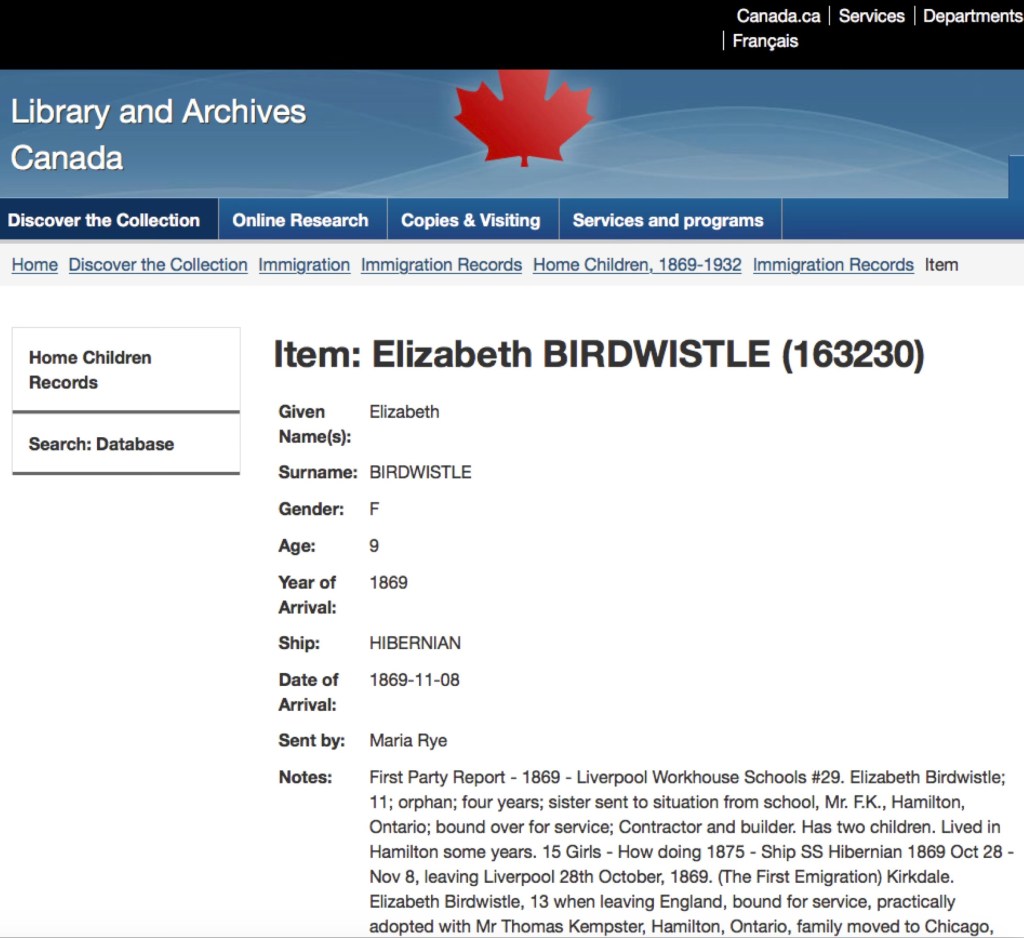
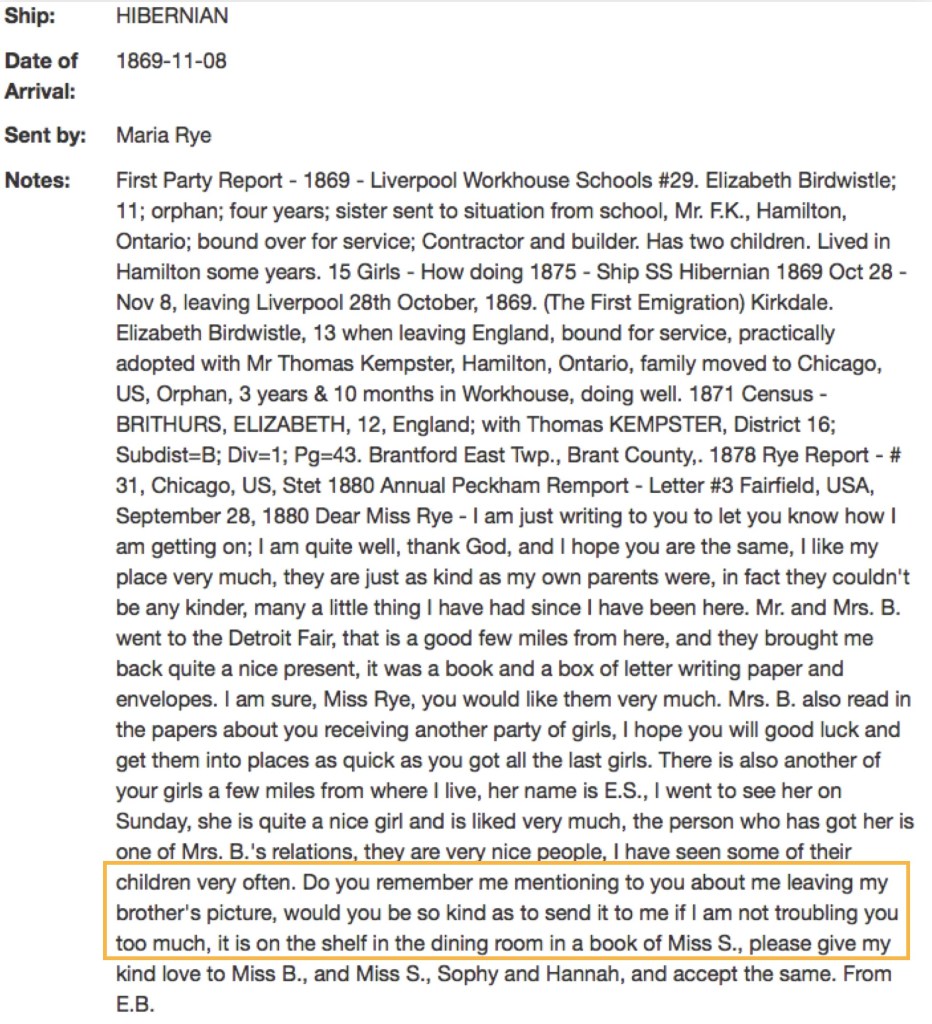
There is a database at the Library and Archives Canada website that contains information on various British Home Children. (Note: When I first did this research, her name was spelled Birdwistle in the database. A search today on their new site shows the name as “Birdwhistle.” Also, the digital image would not load last time I tried. So much for website “upgrades.”) So here is a screenshot of the old version for Elizabeth Birdwistle’s entry:

So, not only is Elizabeth Birdwistle an orphan who has been shipped off to a whole new land, she also forgot her brother’s picture and was hoping to get it back. I don’t know if she ever did. I don’t know if she ever saw her brother again. But I can tell you that I researched her forward in time and learned some more about her.

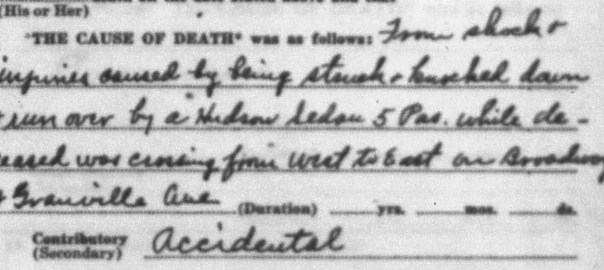
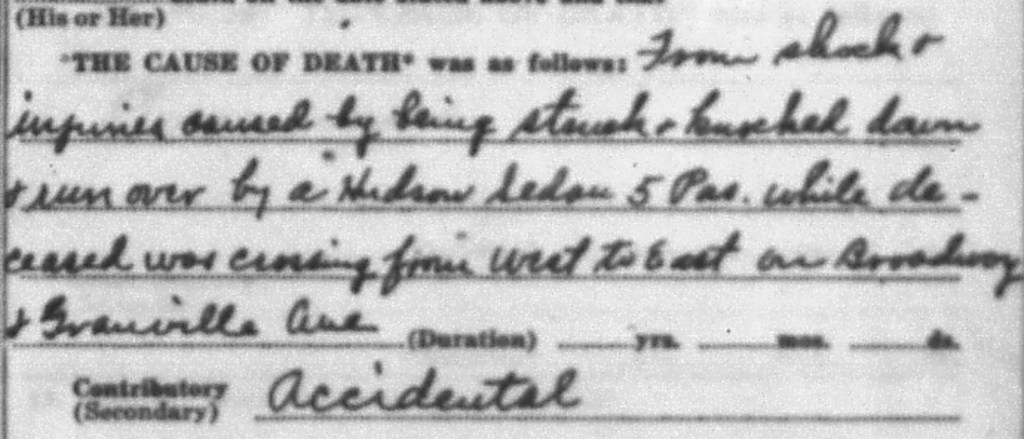
Elizabeth was living with the Kempster family in Chicago in 1880. By 1900, the Kempsters had moved to Seattle, but Elizabeth did not go with them. She stayed in Chicago where she lived and worked as a washwoman. She never married. On 18 April 1921, she was crossing the street near her home and was struck by a car and killed. Her death certificate tells the story:

If you can’t read it, it says that the cause of death was “From shock and injuries caused by being struck and knocked down & run over by a Hudson Sedan 5 Passenger while deceased was crossing from West to East on Broadway & Granville Ave.”

She never had children. No one is looking for her. So I check in on her from time to time, finding a new tidbit about her life every now and then.

Have you adopted any ancestors? You should give it a try. It can help learn new things and bring some stories to life for people that may have been forgotten.

Adopted Ancestor – Alice Irene (Sly) Bierman

Alice Irene Sly was my great aunt. She was the daughter of Lucy Long, born in 1910, and was unofficially adopted by Sanford Sly when he and Lucy married in 1913. I didn’t know about this right away. One time, while visiting my mom’s half-sister, she said to me in a semi-hushed tone “you know she’s not Sanford’s, right?” I looked around. First of all, it was just me and my mom there, no one else was around to hear. Secondly, all of the people in this story had died a very long time ago. The last one was Lucy who died in 1980. Why all the whispering? (But I digress.)

Alice contracted tuberculosis at some point. I haven’t been able to figure out exactly when this might have happened. But Sanford, Lucy, Alice, and their son Bill, moved to Buckeye, Arizona, for the benefit of her health. By following them in the Bowling Green, Ohio, city directories, I can tell that they moved sometime between 1934 and 1935. Alice died on 23 August 1938 in Tucson. Her death certificate states that she had been in the state for four years at the time of her death.

Alice met Cleveland Charles Bierman (commonly went by C.C.), also a patient at the hospital in Tucson. They married on 22 August 1936. They did not have any children and she died almost exactly 2 years later.

When Alice died, it was during the Depression. I am not certain what Sanford’s financial situation was, but Alice did not get a tombstone on her grave. I know she was a beloved child so I imagine the cost must have been a challenge for them. This spring, with the help of my mom, we got a tombstone ordered for her. It is set to be installed by October and as soon as it is, I’ll get a photo and will share it.

Even though she is not a direct line ancestor, I have adopted her and research more about her from time to time since she had no descendants who are “looking” for her.

Adopting Ancestors

I don’t know about you, but from time to time I find myself adopting ancestors. They are not usually part of my direct family line or maybe not a part of my family at all. I especially feel compelled to adopt someone who did not have any children and therefore there is no one “looking for them.” That’s how I feel about it. With my own ancestors, I’m looking for them in records, books, and cemeteries. These people who did not have children probably don’t have anyone looking for them. So, when I find them, I’m compelled to research and then tell a little bit more of their story.

I have two that I’m going to share in two separate posts. But I’ll give you a bit of background that will probably get repeated.

First, my great-aunt Alice Irene Sly. She is in my family but not a direct ancestor. She died at the age of 27 from tuberculosis. The family moved to Arizona to help her health. She married but never had any children.

Second, Elizabeth Birdwistle. She arrived in Canada as one of the British Home Children, an orphan from England, and sent to Canada to be adopted by a family. She did not marry or have children. She moved to the Chicago area where she died.

I’ll share their stories in the next two posts. I’m curious if you “adopt” ancestors along the way?

Reviewing Assumptions

I’m continuing my work to review and clean up my early research. And you know what they say about assumptions…

I had always heard about our “Arizona” family growing up. Sanford and Lucy Sly moved to Buckeye, Arizona, for the benefit of their daughter’s health. I had always thought they settled in Buckeye because they were from Ohio (the Buckeye state). Turns out, they weren’t the first ones to move there. Sanford had aunts and cousins who lived there before he did.

And this makes sense. People don’t often go to a place they’ve never heard of. Usually migrations happen in chains. One person goes (likely because THEY had a friend or family go first) and then the next person in the family goes and so on. Like a chain.

As I was working on some of my genealogy clean-up I’ve been doing, I did some basic research on the siblings of Sanford’s mother, his aunts and uncles. One of Sanford’s aunts, Emma Jane Avery married Andrew Glenn in Wood County, Ohio. They moved to Phoenix, Arizona, sometime between the 1900 and 1910 census.

Andrew died in New Mexico while on a trip in 1926. His widow, Emma, went to New Mexico and accompanied the body home to Phoenix. Emma died in 1927, just a year later. Some of their children lived in Arizona after their parents’ deaths. The daughter Pearl lived in Gila County until her death in 1963. Pearl’s siblings also lived in Arizona, mostly around the Phoenix area. Sanford and the children of Emma would have been first cousins and most likely known to each other. It was quite possibly the fact that he knew family in the area that brought him to Arizona. It is easier to move to a new place when you know someone there already.

So, check your assumptions. And if someone moved to a far off place, check for friends or family members who may have also moved to that area. They did not often go alone.

Timeline Analysis

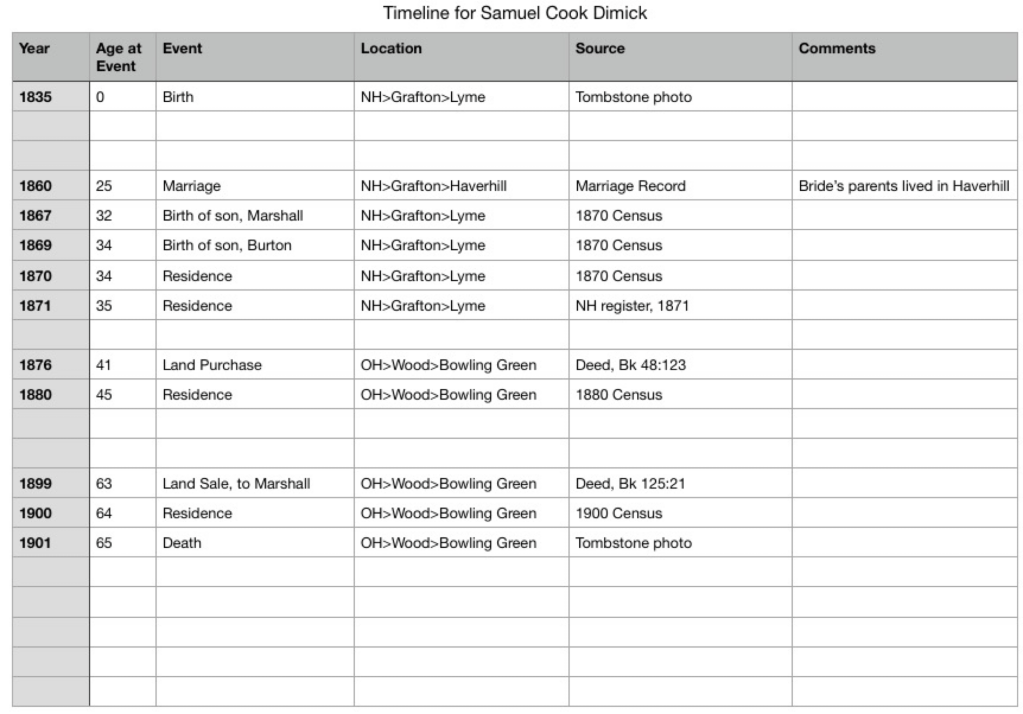
I mentioned my timeline for my ancestor Samuel Cook Dimick a few blog posts ago. Let’s take a look at his story. When I was first researching him, one of my main questions was “why.” Why did he take his family away from New Hampshire (where it is beautiful, I’ve visited) to Wood County, Ohio? Wood County is about as flat as flat can be (well, with the exception of large parts of Kansas and eastern Colorado, but I digress). Why was I from Ohio and not New Hampshire?

I have a fantastic county history entry for Samuel in the Wood County History. It has so many details about him and his family. I started corroborating that biographical sketch with documentary research. I set out to prove (or disprove) each point. (I’m still working on a few points that I need to do onsite research for, but it is mostly finished – and all points proven so far.) I started by making a timeline of the known information I had for him and then started adding those points from the county history as I proved them.

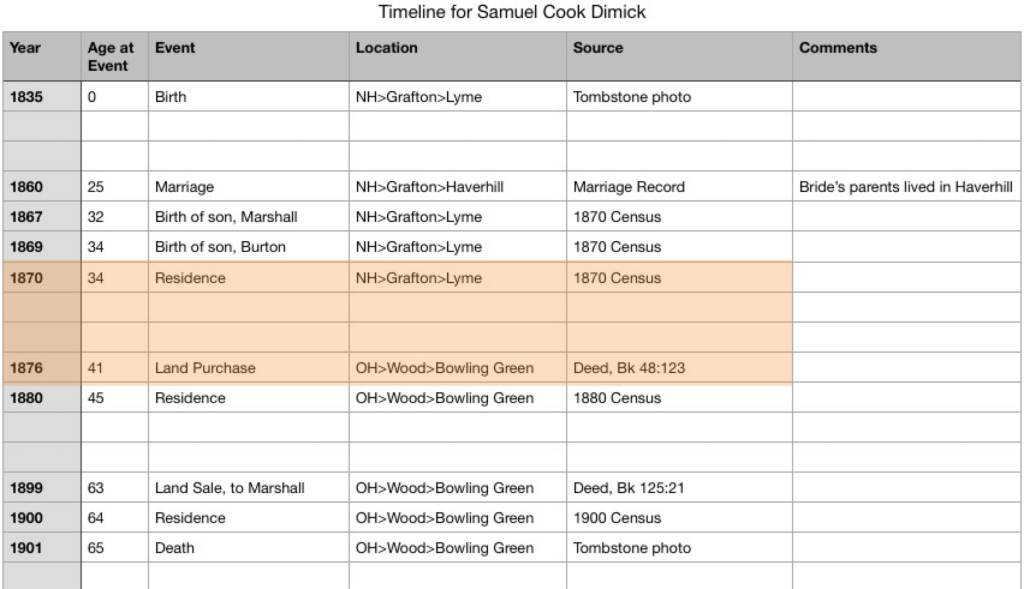
Here is an early version of the timeline. The orange box shows the gap in time between when he lived in New Hampshire and when he moved to Ohio. This is where I started asking some of those questions I mentioned in a previous blog post.

What records could I use to fill in the gaps? To keep a long research story short, I looked at a lot of records, including city directories for Bowling Green, Ohio. They do not have them for these specific years, so I was out of luck in that regard.

I reread the county history.

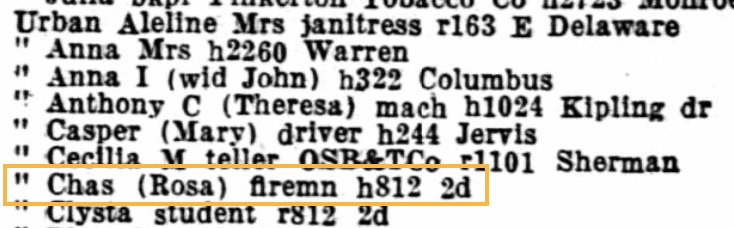
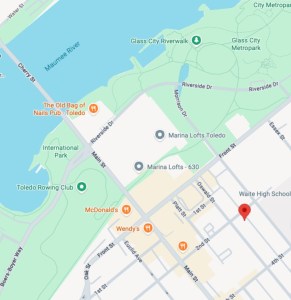
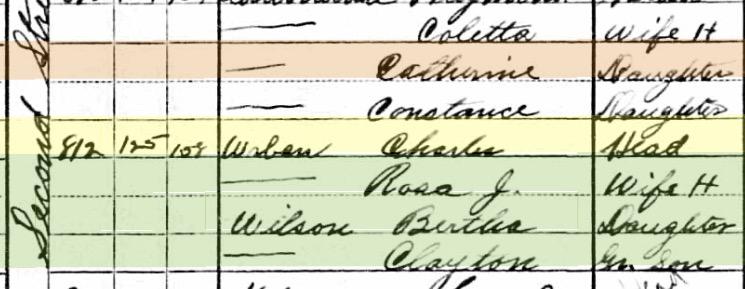
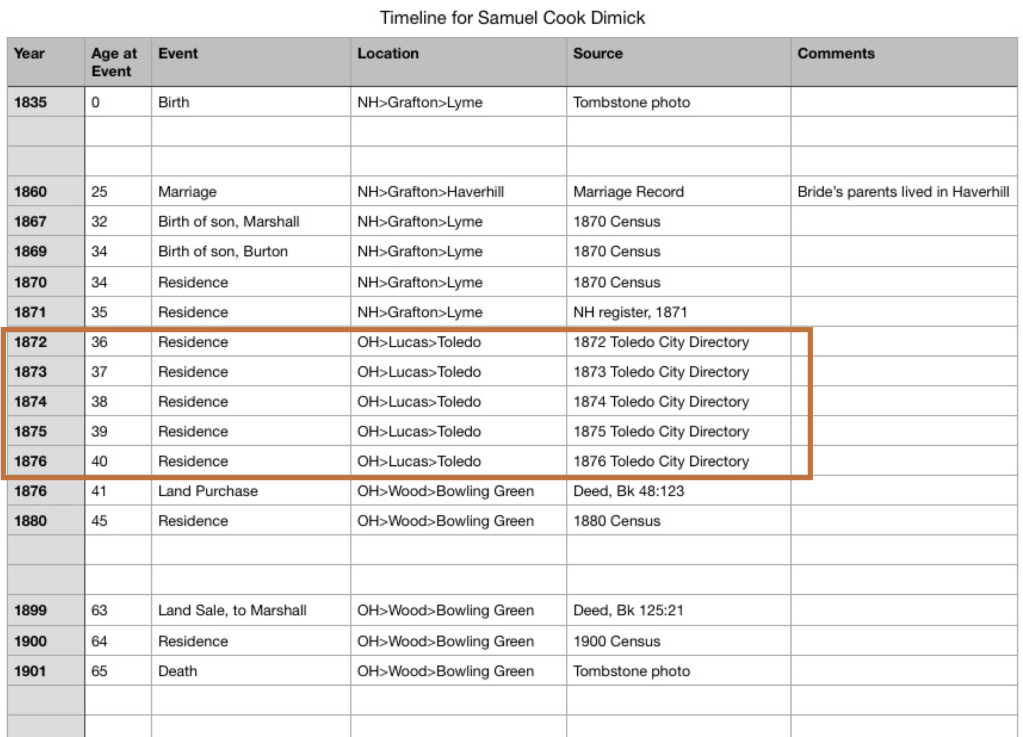
I’m sure none of you have ever glossed over things you read, have you? This is why it is important to go back and reread things you’ve read before. I had learned a lot since the first time going through the county history. But the answer I needed was right there in front of my face. The family lived in Toledo for a while before he moved the family to the “Old Williams Farm” in Wood County. This allowed me to go back to city directories, but this time to directories for Toledo, which is in Lucas county. Sure enough, I found Samuel live there for the roughly five-year gap.

This allowed me to fill in the gap and ultimately answered the question about why the moved from New Hampshire to Ohio. The city directory shows that Samuel worked for “H. M. Clark & Co. Manufacturers of Tin and Japanned Ware.” In the 1870 census, Samuel’s occupation was in “tin.” Turns out, H. M. Clark is roughly the same age as Samuel, also born in Lyme, New Hampshire, and they served on a town council together in Lyme. So, Samuel moved to Ohio for a job opportunity.

Other research has filled in Samuel’s timeline beyond this, but the visualization of your known information allows you to get more detailed and fill in those gaps, thus building a more robust understanding of your ancestors.

Timelines: Special Projects, In and Out Tables

Sometimes in our research, we come across an ancestor who did a lot of land deals. And you may want to understand what he was up to in more detail. Putting those land records into a timeline can really help. These are sometimes called “in and out” tables and may not necessarily be intended as timelines, but if you set up your spreadsheet or table in a way that allows you to sort by date, that’s exactly what you’ve created. You can follow a particular piece of land AND you can follow a person’s land transactions.

While working on my George Long project, I needed to disambiguate two George Longs in Hancock County, Ohio. One bought and sold land frequently in that county, the other owned one piece of land. (Can you guess which one mine was?)

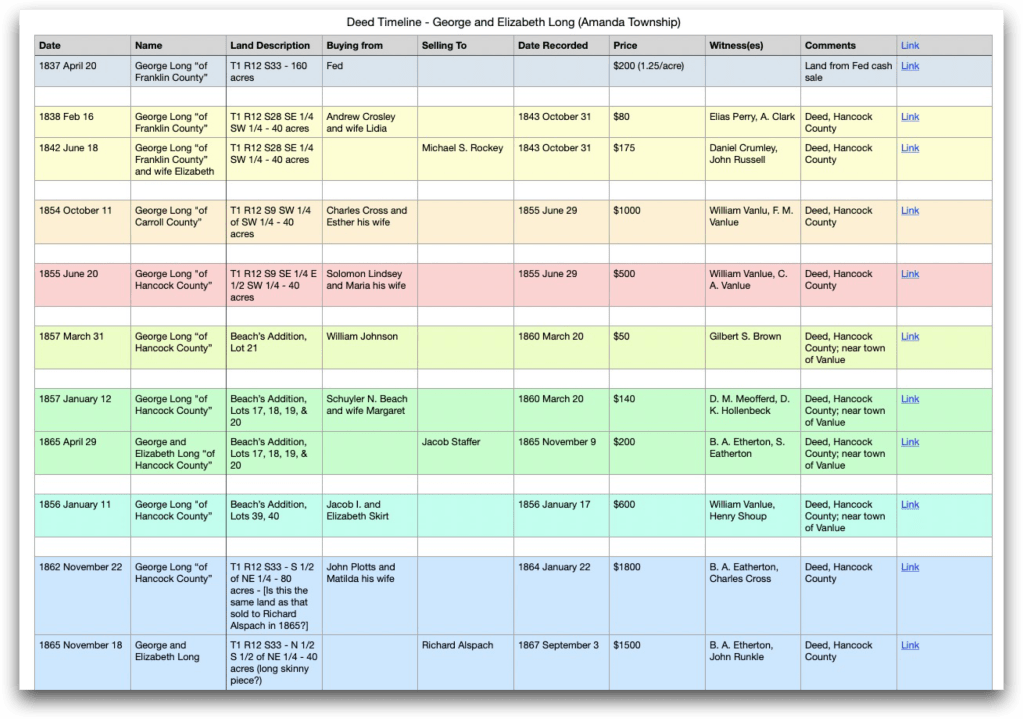
Here is the table. The first image shows each piece of land next to each other, color coded to match. You’ll notice that in some cases, there’s only one entry. That means I did not find the “in” or “out” deed for that land in the timeframe I was working in. The land could have been inherited or disposed by will rather than in the deed books I was looking through. More research could be done to find those. (However, this is NOT my George Long, so I don’t think I’ll be doing that research.)

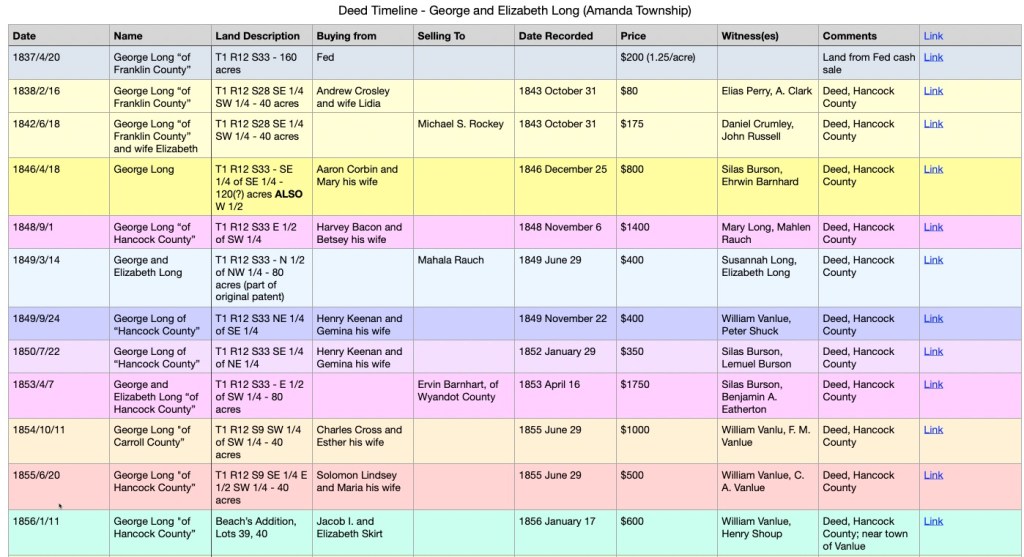
The above table is organized by piece of land. However, because of how I captured the data, one click turns this into a timeline.

Timeline sorted by date.

If you are paying attention, and have read this far, you may have noticed that the first table is in fact NOT entered such that it will sort properly on the date. And if so, you get a gold star for the day. I had to go fix that for this blog post. It sorts alphabetically, essentially, so if you type of the names of the months, they will not be in proper month order. I had to go back and put the dates in by number instead of name so it would sort properly.

Couldn’t “they” have named the months in some kind of alphabetical order? I prefer the names over the numbers, myself, but that doesn’t sort right, so humbug.

Timelines: Special Projects

Timelines can also be use to visualize other types of projects or research goals. Probably the best two examples I can share from my own research are when trying to disambiguate two people of the same name (do we have one person or two?) and when trying to compare deeds for someone who did a lot of buying and selling of land (often called an “in and out” table, but they can also be timelines if you set them up in your spreadsheet to be able to sort them chronologically).

“One person or two of the same name?” is a common genealogical problem, especially in an area where a family lived for several generations. All the brothers named sons after grandpa and pretty soon, no matter how unique a name may be, suddenly there are multiple men with the same name in the same county at approximately the same time. How do you differentiate them? One tool is a comparative timeline or a “side-by-side” timeline.

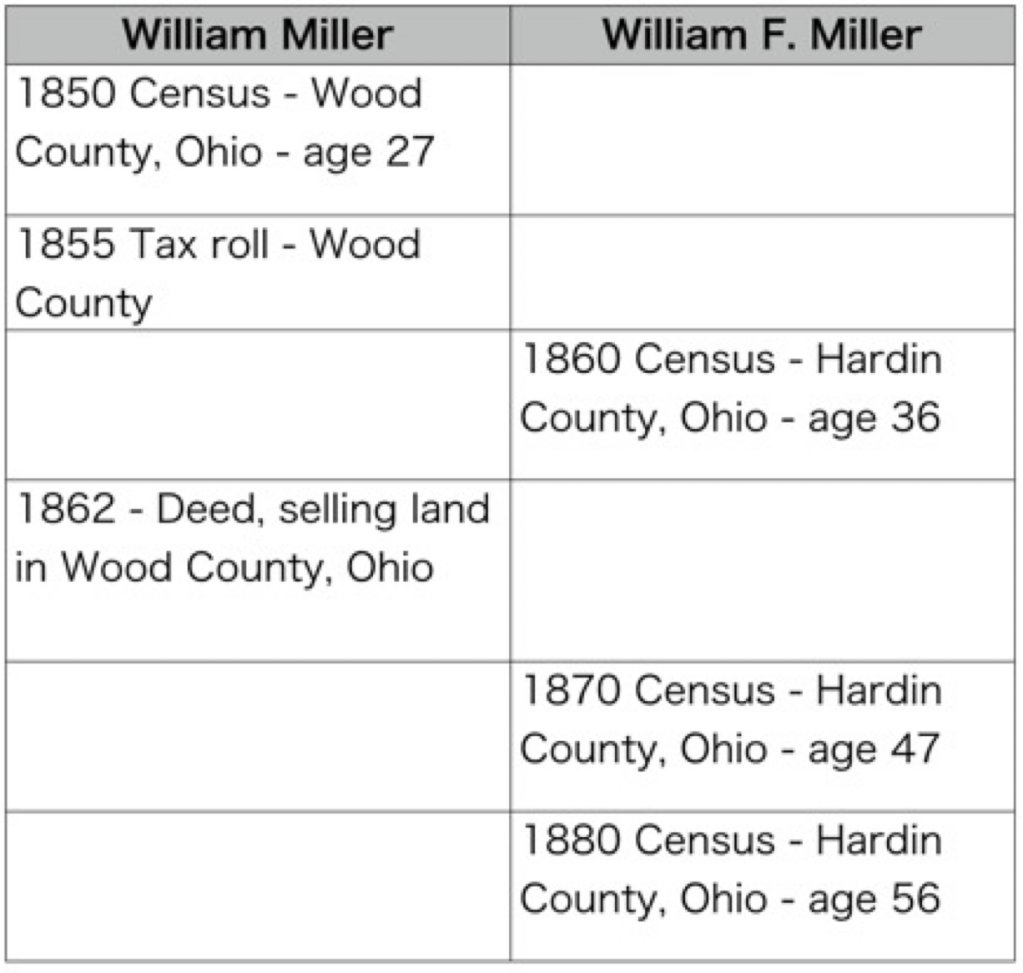
Make columns for the same-named people. In my example below, we’ll just look at two to keep it simple. I then put abbreviated information in each box/cell for that person. Enough to put it in chronological order, see a location, an age, and the source. In the case below, you can see a census, tax, or deed year, a location, and an age for William Miller and William F. Miller.

An example of a comparative or “side-by-side” timeline.

In this simple example, the two men do not overlap in records or location, at least as presented in this timeline. You need to ask yourself questions to fill in any gaps and to try to prove or disprove that this is one man or two men. Some general questions I ask myself:

  • What time gaps are there that I can fill?
  • What records might fill those gaps?
  • What historical events were happening that might explain those gaps?

Some questions specific to this project I ask:

  • Can I find William F. Miller in Hardin County in the 1850 census?
  • Are tax rolls available for Hardin County where I could look for William F. Miller?
  • Can I find William Miller in Wood County in 1860 or 1870?
  • How far away are Wood and Hardin counties from each other?

Of course there are more questions and more research that could be done on the above. It is just meant to be an example. (I have my Miller ancestors squared away during this time period.)

The first set of questions work for a single timeline as well. One of my favorite examples of this has to do with my ancestor Samuel Cook Dimick. We will look at his specific timeline in a later post. By looking at data in a different way, we can see patterns or gaps that may have missed before.

Timelines: Tips for Analysis

There are some things you will want to consider when setting up a timeline for your ancestor or project.

First, how are you going to make it (special software, spreadsheet, word processor, paper and pencil)? What tools you use to create your timeline might dictate some of the next items. I like to use digital means, usually a spreadsheet or a word processor, because they are easy to add to, rearrange, sort automatically, etc. However, as a pre-computer native, I like paper and pencil. If I were going to create a timeline for a project on paper, I would suggest using notecards or sticky notes, one for each event, that you can add to and rearrange as needed.

Second, what kind of information do you want to capture. You’ll need to decide on a format so your timeline is consistent. When I am using a spreadsheet, I will tailor the columns to fit my needs for that particular project. For a general timeline for an ancestor’s life, I use these column headings:

  • Year – I usually only use the year unless I need to get more granular, then I’ll change this to a numerical sortable date system such as Year/Month/Day. You may have to work with your spreadsheet’s formatting for numbers so it appears correctly. I usually set them to “text” rather than it trying to interpret a date.
  • Age at the time of the event – I like to capture this because it often tells me something about the person or the event. If someone is paying taxes or getting married, but their age is too young or too old, then it might indicate that I’ve made a mistake somewhere.
  • Name of the event – I keep it simple when possible so “Birth” or “Marriage” usually suffices.
  • Location – Depending on what you are looking for, you might put in the place from largest to smallest or smallest to largest. For example: Lyme, Grafton, New Hampshire vs. New Hampshire, Grafton, Lyme. If I want to see all of the New Hampshire items together, I might opt for the large-to-small option.
  • Citation/source – this does not have to be a full-on polished Evidence Explained citation, but don’t skip this step. I am always second-guessing myself. I do not know how many times I’ve had to recreate my research because I forgot to note where I got a piece of information. Timelines are no different. When you find something that conflicts, you’re going to want to know where you got that information. Do something that works for you, if that’s a link to a document or database, a full citation, or simply “Samuel’s death certificate.” As long as your note tells you enough to go re-examine the record, you’re good.
  • Misc. Notes – When I am creating these timelines, questions invariably come up, or I might want to make a note about a particular event. Put in a misc. notes column to capture those ideas and thoughts.
A work-in-progress timeline for Samuel Cook Dimick.

Next we will look at some more specialized timeline set ups for various projects.

Timelines: Why?

As genealogists, we gather a lot of data. We find our ancestors in many records such as obituaries, death and birth certificates, deeds, wills, church records, tax records, military records, and so on. The list is endless. How do you analyze, process, or understand the information you’ve gathered? And if you’re working on a trickier project, say figuring out which of the 12 George Longs is your ancestor, how do you keep it all straight?

One of my absolute favorite strategies is timelines. Creating a timeline for your ancestor puts his or her life into context and perspective. Obviously (or maybe not), a timeline is a list of events in chronological order. They show the “lifespan” of an individual, a place, or an historical event. Depending on what your goals are, you can create timelines with different focuses. The two main focuses I use are event-focused or document/source-focused.

Each document was created on a date (sometimes you know that date because it is written on the document, sometimes you might have to make an educated guess based on context). By putting together a document-focused timeline you can assess your research and make a plan for any research holes you find.

Document-focused timeline

Documents or sources may list multiple events. A death certificate, for example, will list a date of death, but also may list the birth date, the burial date, the onset of an illness, the date of a coroner’s inquest, etc. An event-focused timeline pulls all those dates out.

Event-focused timeline

As you enter your data into your genealogical software or online tree, if you use them, they may automatically put the events in chronological order, helping you to visualize your ancestor’s life. When I get deep into a project, however, I tend to work in a spreadsheet or word processor so I can reorder things, put in items that may I may not want in my software, add historical context items, and link citations.

Next, we will look at using timelines to compare and analyze your research.