Tag Archives: binders

Spring Cleaning: Binder Components

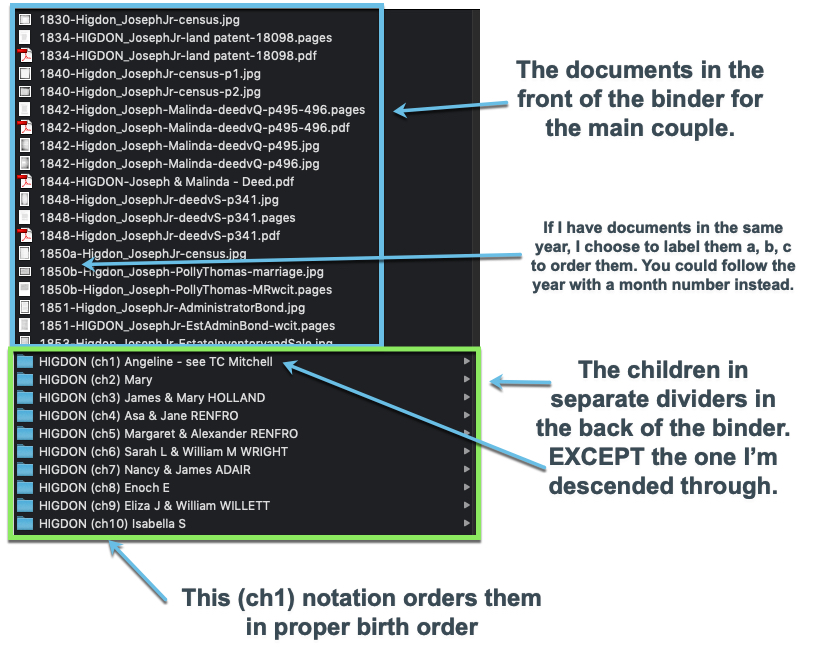
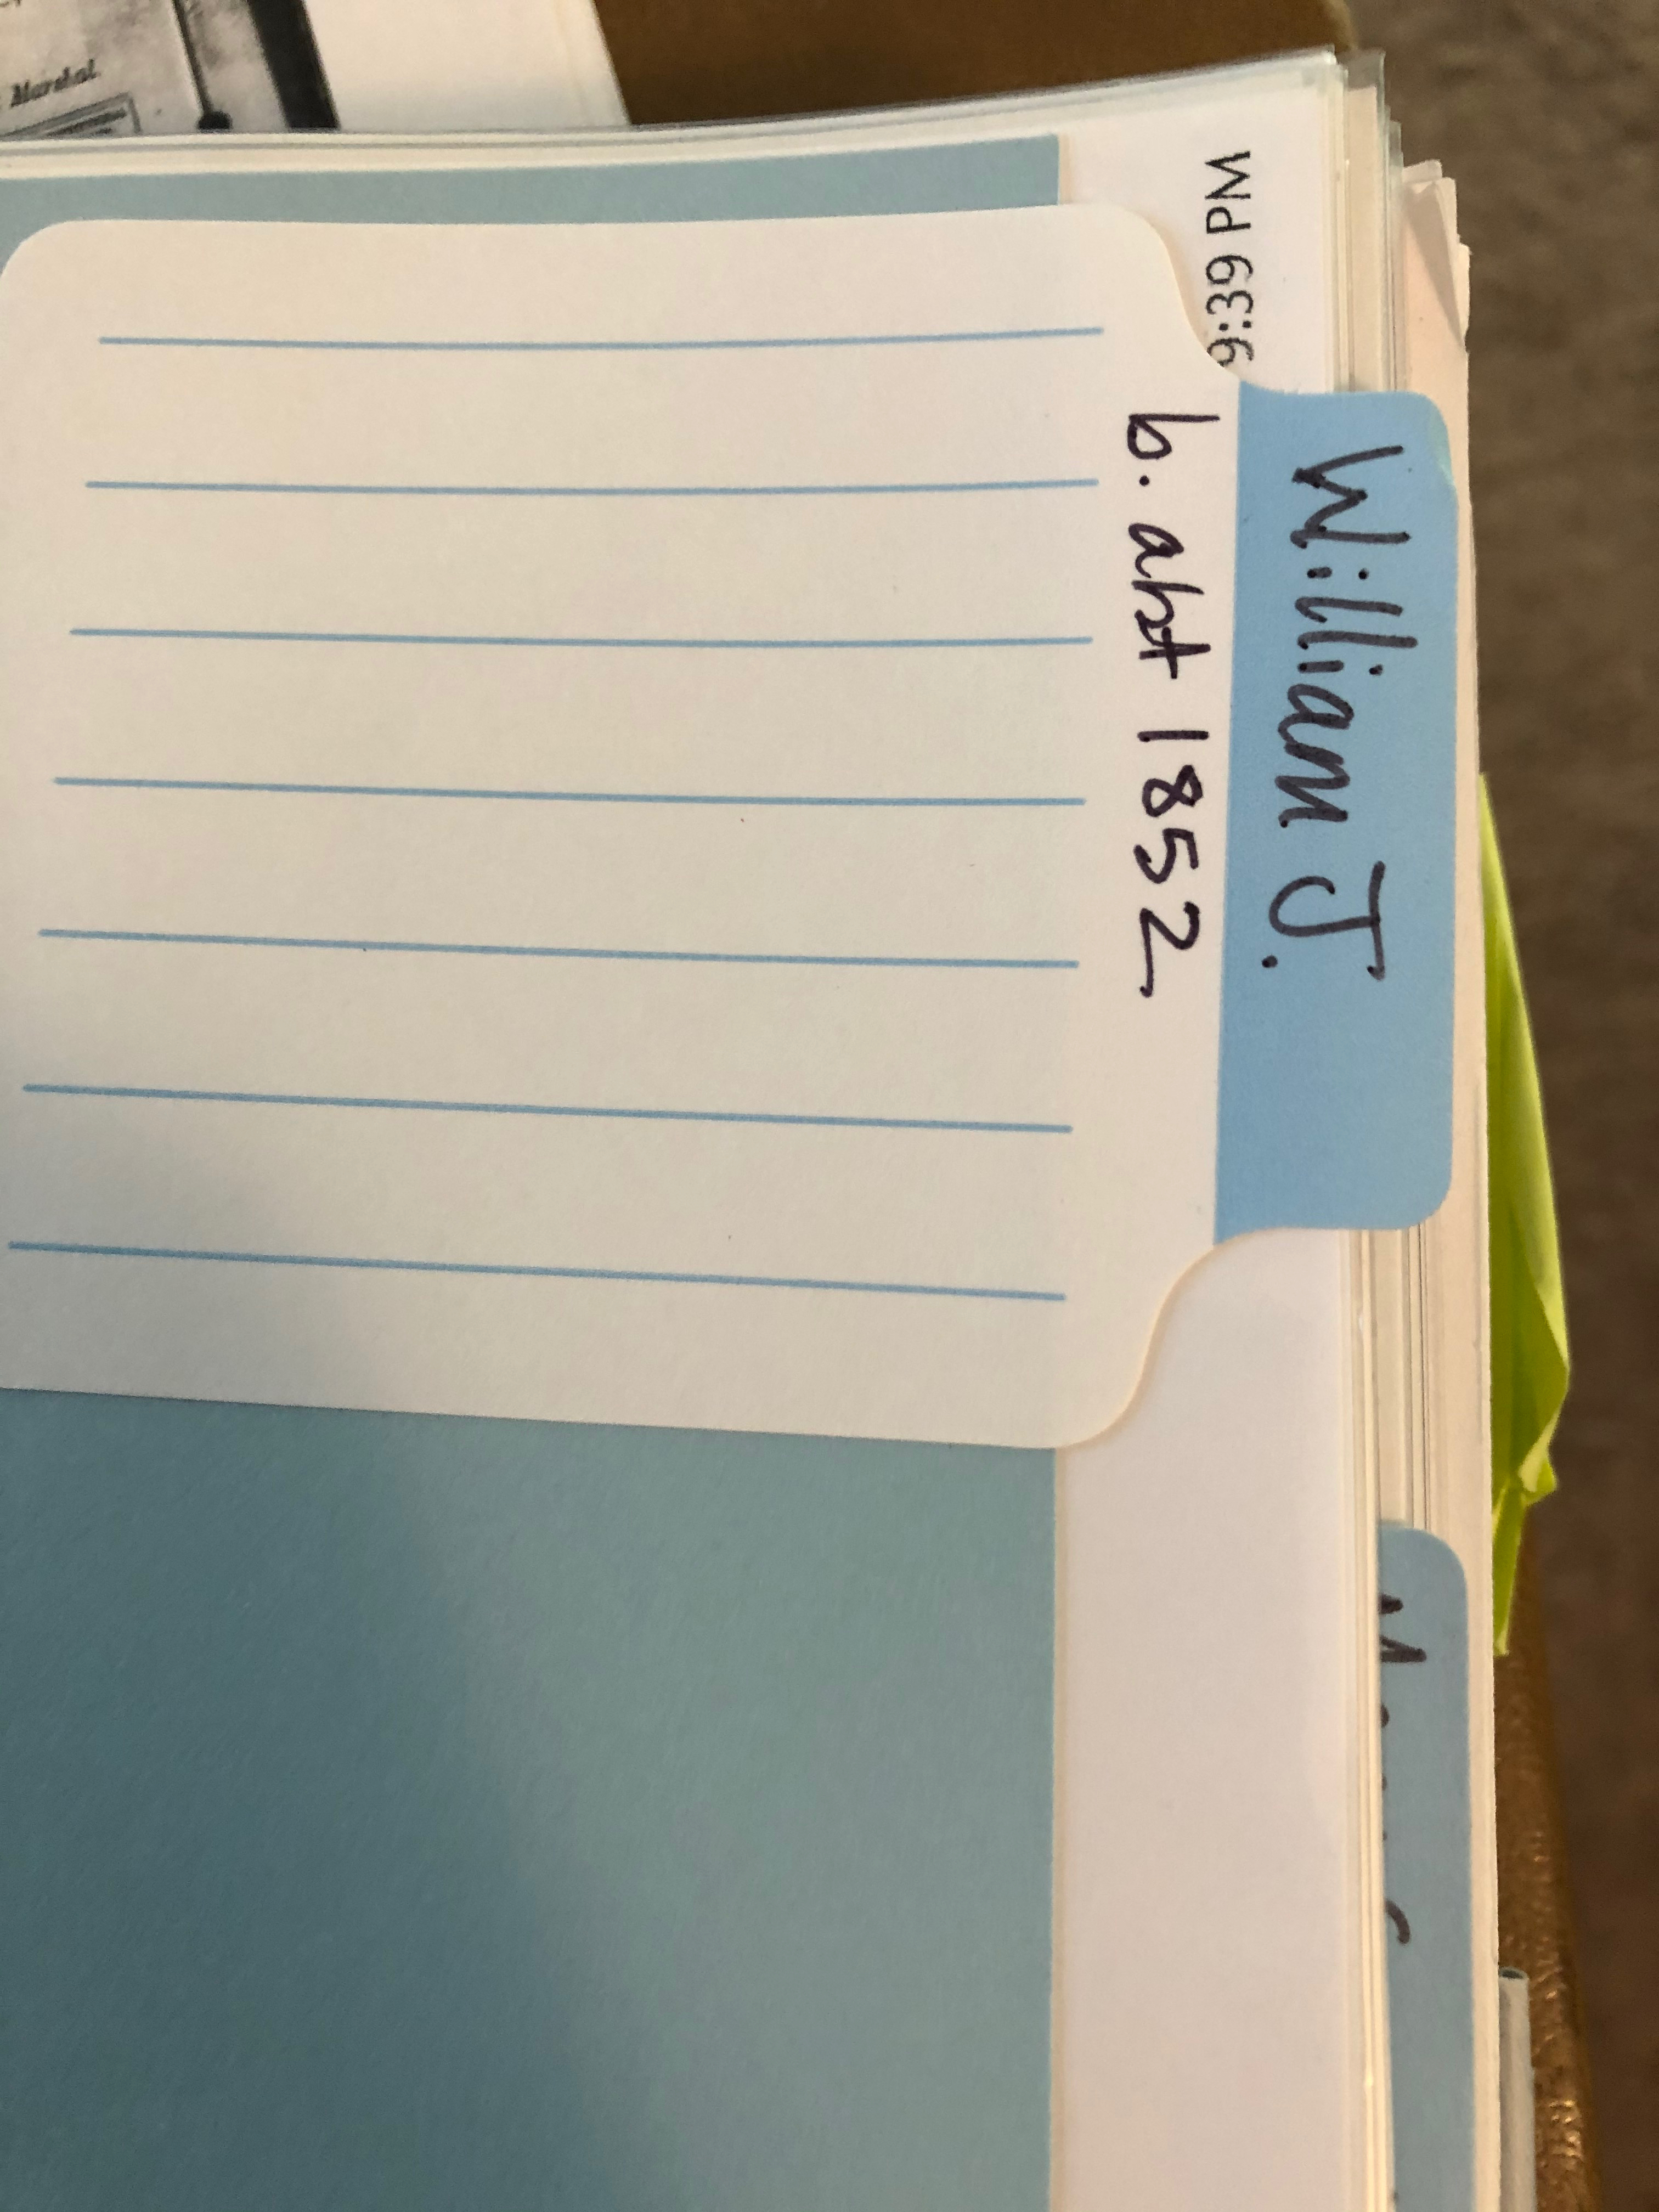
As I am working through George Long’s digital folder and corresponding binder, I like to include a couple of documents with the binder so I can see at a glance what is going on without opening more than the front cover. I use the white binders with clear covers so you can slip in papers in the front, back, and on the spine. For the spine, I title the binder: last name, first name of main couple, birth and death years, and a list of their children, noting which child will have their own binder. George Long’s current binder spine is on the left.

For the back, I like to include a simple cascading pedigree chart, printed from my desktop software, that shows George’s place in the grand scheme of things. At a glance I can see what generation I’m working on.

For the front, I print a family group sheet from my software that shows me at a glance, everything I know about the family group.

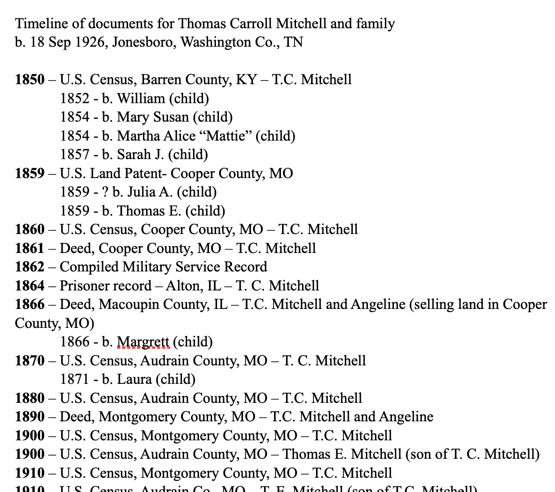
Inside the binder, usually in a plastic sleeve, I have a word document that is simply a timeline of the documents that are held within. This document has a couple of purposes. First, it acts like a table of contents. I can see quickly what documents I have for a given ancestor. Second, since they are in chronological order, they create a quick timeline for the ancestor’s life. I can see where there might be gaps and where more research could be done.

As new information is gathered, these documents are updated, reprinted, and replaced in the binders. I don’t do this for every single little change, but after four or five major additions to the information added to the binder, I’ll reprint these documents so that everything is up-to-date.

Years of doing research but not organizing along the way, has been a mistake. Getting the binders organized and up-to-date will allow my research time going forward to be more efficient. For a fantastic webinar on keeping yourself organized as you go, check out Cyndi Ingle’s presentation at Legacy Family Tree Webinars. (A subscription is required, but consider clicking this affiliate link to get a subscription. It’s the best inexpensive but high-quality education money can buy!)

Spring Cleaning: Matching Binders to Digital Files

I have a whole system that I use to organize my genealogy. It is a hybrid paper/binder and digital system. This may not work for some. Some of you I know think it is ridiculous to keep paper files these days. but I just like to sit down with my binder and “read” about my ancestors as if their binders were their book. My binders also act as a visual timeline that just works best for the way I visualize and think about research.

I’ve said it before and I’ll say it again. The important thing is to do what works best for YOU.

Anyhow, after all of this scanning and sorting and going through my hard drive, I know I have some family digital files that I have not made match my binder system. I started doing this a while ago (several years now) and have just worked on it as I worked on a family project. But I think it might be time to be more methodical about it. (Here’s the blog post about that system.)

The digital corresponding system to my binders.

So, this will take many months to do, but I am going to go through each one of my paper binders and make sure its corresponding materials match in my hard drive. Wish me luck!

Getting Organized: More on the Binders

I know last week I said we would talk about the digital side of my organization system, but I got a lot of questions and comments from the last post asking for more specifics about the binders. I thought I’d dig a little bit more into that this time.

I mentioned that each binder in MY system is focused on a couple and their children, EXCEPT that through which I’m descended through.

The binder organization is broken down like this:

Binder Map

Each document is in chronological order, forming a visual timeline of their lives. In the back are divided sections for each of their children, except for the one who is my ancestor. They will have their own binder. Rinse and Repeat.

If you think of your pedigree chart, each couple is their own binder. The binder follows the pedigree chart. In the visualization below, each matching colored box represents one binder:

Binder pedigree

Now, as you move back in time, you may find you have fewer documents. For the couples that I do not have that much on (yet), I might put several generations in one binder until it gets too full and needs to be separated due to space issues. For those that I have done a ton of work on, I will get a 2″ or 3″ binder for their documents. Whatever size, I always make sure to get the kind with the clear slip-in fronts, backs, and spines. Then I clearly label what is in each binder.

If for some reason, I do a lot of research on one of the children for a couple that is NOT my direct ancestor, they may get their own binder. In their parents’ binder, I will still include a divided section for them with a sticky note or piece of paper inserted telling me where their information can be located. I will mirror this information on the binder spine.

When discussing the binders, I often get asked about archival quality binders, paper, what do I do with my original documents, etc. MY system is not a system where I keep any original documents. Most of the time, I am obtaining photocopies of documents whether it be from a repository or downloaded from the internet. I am not preserving documents that cannot be obtained again. I have very few of those in my possession. What I do have, I have in archival boxes. Smaller items are in an archival folder my fire safe (I only have a small one) and larger items are in their archival folders but stored flat in a plastic box that will protect them from water damage. Now, if we have a massive fire or a major flooding event, I’m not delusional. I know that these methods may fail. If the worst does happen, I do have most of my materials digitized (even those that are irreplaceable) and backed-up on the cloud. (Like all good genealogists I know, a few projects are still waiting to be done.)

I hope this helps explain the binders and the system in more detail. Next week we will move on to the digitized aspect of MY system. I promise.

Getting Organized: My Binders

I promised photos in the last post, of my actual binders so you could see what I was referring to. I want to again reiterate that MY system may not work for you. You may think completely differently about organizing and how to locate your ancestors’ information in an efficient manner. You may not do paper at all. That is entirely ok. (I will not be offended if you skip these posts until I start talking about my digital files!)

Here is a view of the binder spines:

IMG_3939

The front of each binder has a family group sheet so I can see at a glance which family that binder holds:

IMG_3942

In each binder, I include a timeline of the documents that will be found inside. You can easily update this when you find a new document. (I personally will add them in by pen until I get several and then I will reprint it.):

IMG_3940

I have the children of this couple in the back of the binder, in chronological order, EXCEPT my direct line ancestor (the child I descend from). I create my own dividers with card stock and use sticky labels that you can write on:

IMG_3941

You might see colored sticky notes and other things sticking out if you examined my binders in detail. Those are generally items that are WIPs (works in progress). Those might be things I didn’t have time to write the citations for but I wanted to get it in the binder rather than put it in a stack. They might be items that need more research and the note indicates what that research might be. Primarily, they are there to get my attention next time I have time to work on them.

That’s basically it. Every document is “processed” (which we will go over that in another post), printed, put into the document timeline, put into a sleeve and put in its place in chronological order in the binder.

Next time we will go over the digital side of this. I mentioned before that I do both, paper and digital. I know it might be duplication of my effort, but it is what works for me. Again, DO WHAT WORKS FOR YOU. I can’t say that enough.

Getting Organized: Choose a System

First and foremost, you need to decide on YOUR system. Figure out what is going to work best for you. Do you think about your ancestors’ documents:

  • chronologically
  • by surname
  • by document type
  • by family group
  • alphabetically
  • by location
  • by event

There are many ways you can organize your papers. All that really matters is that it makes sense to you, that it is organized, that it preserves your documents, and you can find what you need in a reasonable amount of time.

I think of my ancestors in terms of the timeline of their life. I organize my files (both paper and digitally) chronologically by couple. I’m going to address my paper files first, we’ll look at my digital system in a later post. As I’ve expressed before, I’m a very tactile person. I like to read, organize, and think about my research on paper. It just makes more sense to me. So, I organize my research in binders. Each binder contains:

  • a family group sheet for the couple and their children
  • all of the documents for that couple’s life
  • separate section for each of the children (except for the one child I’m descended through), their documents in chronological order
  • a document timeline (like a table of contents that gets updated after I add new documents) – see image below

doctimeline

A question I usually get is: what about the husband or wife, where do their documents go? In my system, they go with their husband/wife, and not with their parents. I put an indicator page where they should go with a note to “see X binder.”

A few logistics: I typically use 1″ binders. However, there are some families I’ve done an absolute ton of work on that I have 2″ or 3″ binders for. There are some families that I have not done that much on yet; several generations of those families might be in one binder. I also use those white binders with plastic covers that allow you to slip paper down into. So, the front of the binder has the family group sheet, and I utilize the binder spine to label the binder for which couple (birth and death dates) and their children. I also note on the spine something like “except William Long, see Binder X” or something like that to tell me at a glance which binder I need.

The next post will have more photos of my actual binders and discuss some other organizational logistics as it relates to paper.

Thanks for reading!