Birdie was a dear friend and my genealogy mentor. She was a special person, just always making you feel welcome, seen, heard, validated, and like your ideas matter. When she died in 2010, I was devastated, and I know many others were too. It’s not everyday that a Birdie comes along, takes you under your wing, makes you laugh, and gives you a career path you hadn’t considered. I would not be a professional genealogist today if it weren’t for Birdie. I owe her so much.
After he passing, a fund was created in her honor that had three parts: a sponsored lecture at the NGS conference, a volunteer of the year award, and an scholarship to attend IGHR (the Institute for Genealogy and Historical Research). The fund has since been closed. However, IGHR wanted to revive the scholarship in Birdie’s name and offered to hold and administer the funds if I would help coordinate it and help find donors. Of course, I said yes. If one more person can benefit from Birdie’s influence, then it is worth it! Birdie was the one to first encourage me to attend IGHR.
IGHR will accept donations (tax-deductible) for the Birdie scholarship and they will collect applications for those who wish to apply for it.
Please feel free to share this information with your societies and genealogical friends, either to help get donations but also to let students know about the scholarship opportunity. I would appreciate it and I know Birdie would be so pleased to have students attending IGHR. She was an ardent supporter of high-quality education and I’m so happy to help fellow genealogists attend as well.
When you are starting to work on a more difficult research problem, beyond the collection phase, you’ll want to make more directed, pointed, plans for your research. Here are the steps I take to plan research:
Think about your research question. Clear it up if it isn’t already clear. Who exactly are you trying to identify? Have you singled out a unique person in time and place? Don’t make it too complicated or to simple. There is a Goldilocks effect when it comes to a research question, one that is “just right.”
I catalog my starting point information. During this process, I reevaluate what I have. Many times this is research I haven’t looked at for a long time. Are the assumptions I’ve made sound and based on documents? Is my starting point information actually correct and known to be for the right individual? Are there any conflicts in the starting information? I write all of this down, usually in bullet points. If there are a lot of conflicts, they may get their own section. Sometimes (often?) I find some kind of mistake I made in my reasoning, often because I didn’t know then what I know now. I have more experience and knowledge now and sometimes that breaks through a brick wall all by itself.
I make a list of what I need to do to resolve anything from step 2. If there are conflicts, can I give sound reasoning as to why they may exist? If not, what additional research do I need to do to resolve them? If I made an incorrect assumption, what do I need to do to correct it?
You’ll notice that everything above is not even planning the RESEARCH yet!
I survey the records that are available (both online and off) that may answer my research question. I utilize the catalogs available on websites such as Ancestry, FamilySearch, and local public libraries, archives, universities, and etc. as it applies to the topic or the location I’m working in. From that research, I may make a larger list, but I truly start with a top 3-5 items. Invariably, you’re going to find something that changes the course of your research. Spending too much time creating an extensive and detailed plan will likely be a waste of time.
Conduct the research! This is the fun part. Look at what you planned on looking at. Note why you are looking at it (purpose of search) and what you found. Collect any URLs, waypoints, download images, note any conflicts, note any negative findings, and note any changes in your plan or direction of your research.
Whether you are in collection mode or brick-wall mode, planning your research is an important part of being efficient with your research time. Hopefully you found some trips or tricks you can use from this series on how I do it. Everyone thinks and plans and organizes differently. So take what you think will work for you and go make it happen!
We looked at a blank example of my research PLOG template that I use in Evernote last time. You do not have to use Evernote to make something like this. You could use Word, Mac Pages, Google Docs, a spreadsheet, or any other note-taking tool of your choice. This is simply how I do it. Please adapt to find something that works for you and your way of thinking.
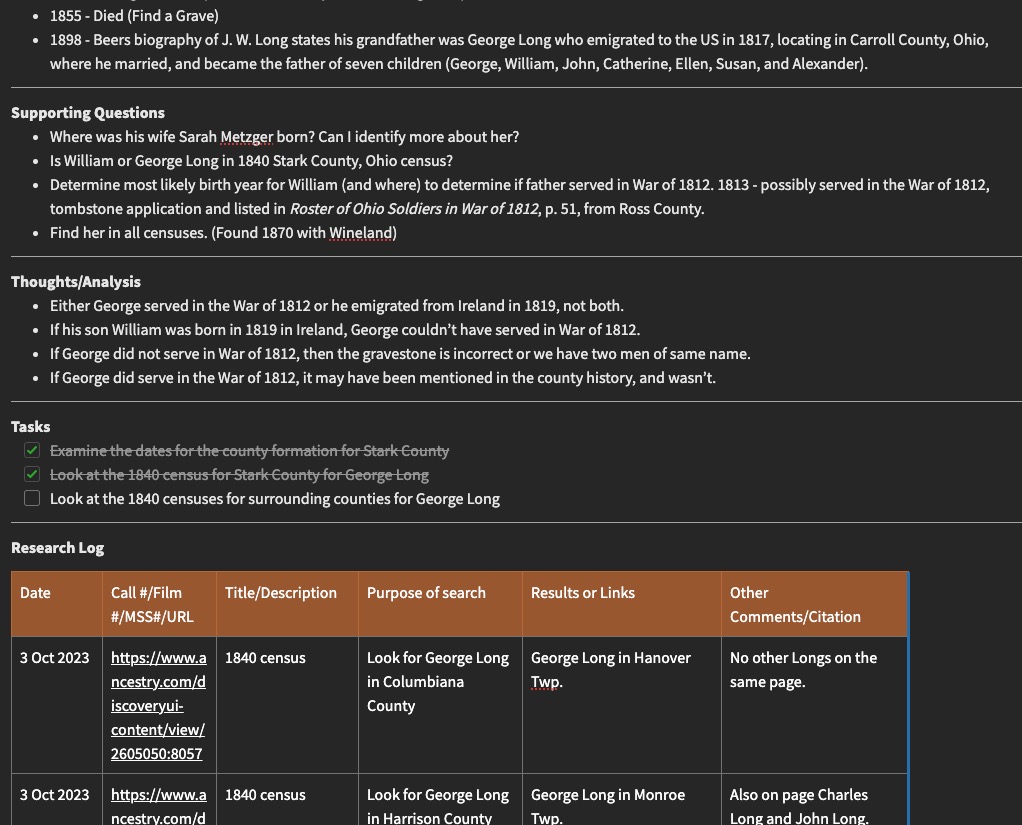
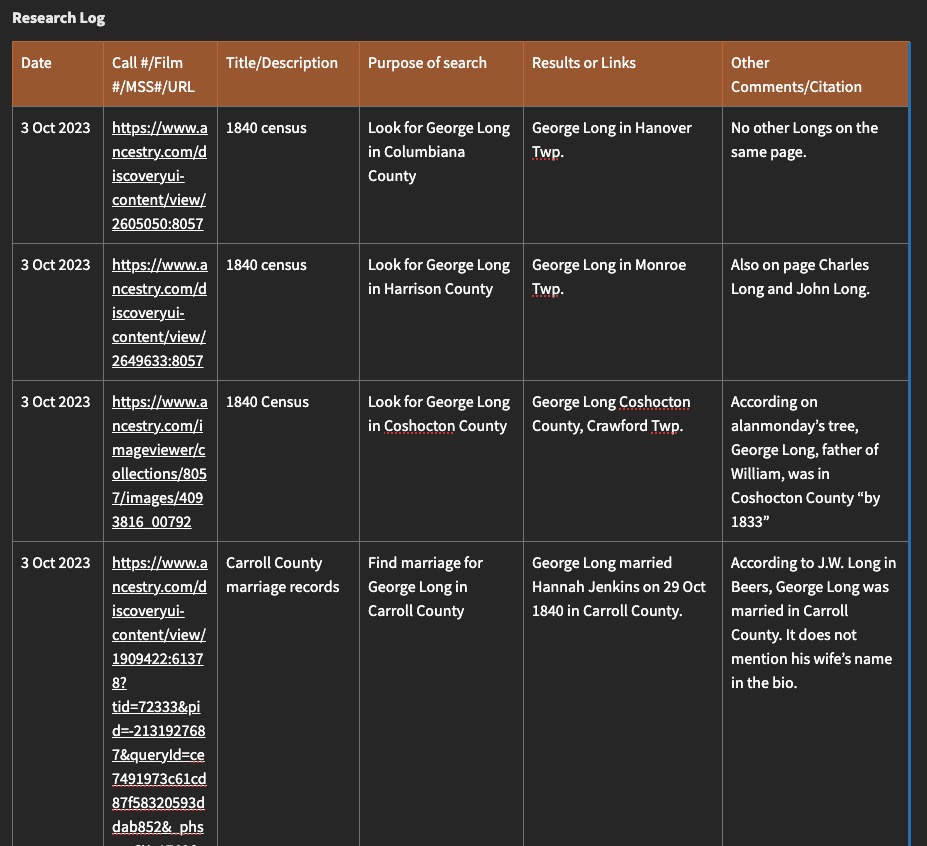
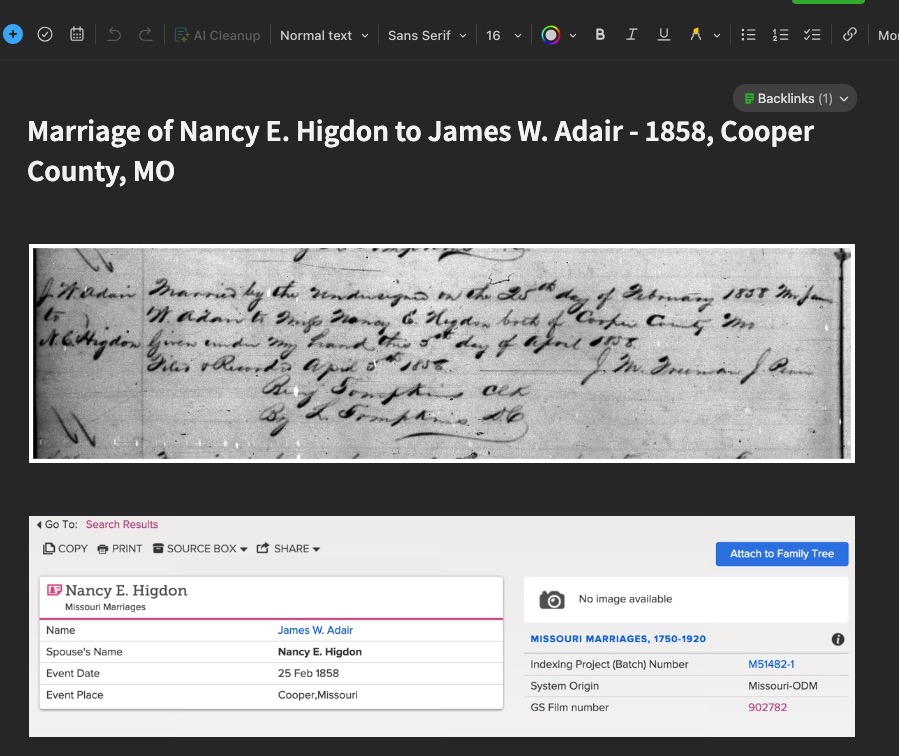
I am currently working on a project to identify the father of William Long who was born in about 1819 in Ireland and who married Sarah Metzger in Stark County, Ohio, in 1841, and died in Putnam County, Ohio, in 1861. I have only a name for his father “George Long.” The problem is, there are a lot of George Longs that could be the father of William. The son of William, John W. Long, has a biographical sketch in the Wood County, Ohio, county history that states that his grandfather was “George Long” and he “emigrated to the United States in 1817, locating in Carroll County, Ohio, where he was married and became the father of seven children: George, William, John, Catherine, Ellen, Susan, and Alexander.” There are a few problems with this, one of which is that Carroll County was not formed until 1833 from Columbiana (1803), Stark (1809), Harrison (1813), Jefferson (1803), or Tuscarawas (1808).
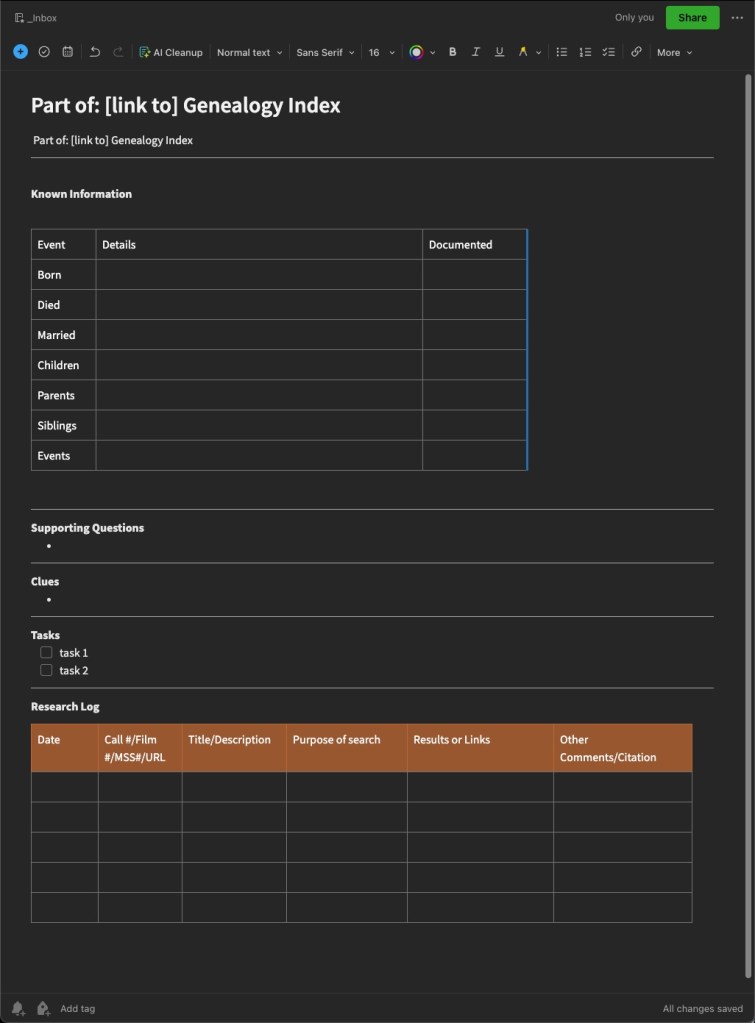
So, my research question is listed at the top of my “plog” template, followed by a cataloging of known information, supporting questions to answer, thoughts and analysis of the problem, some tasks, and then the research log portion of the template, which will get filled in as I complete the tasks.
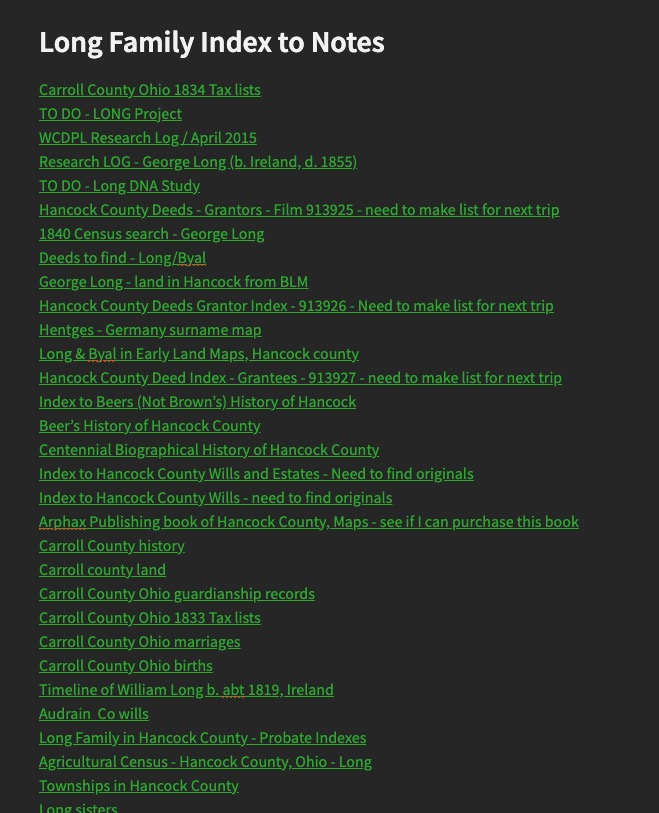
As you complete tasks, they often create more questions than they do answers. I document these in the last column and add things to the task list. Sometimes the template gets too long and too much scrolling needs to be done. One cool feature of Evernote is that you can link the notes together and essentially create an index where you can see all of your notes for one particular project in a list. Provided you titled your notes in a meaningful way, this will be great to get to notes quickly rather than scrolling through long notes. There are likely ways to do something similar in other programs.
So, that’s the mechanics of research “Plogs” and how I use them. The next post will have some final thoughts on research planning and logging in general, tips and tricks, etc.
Last time we looked at research planning for when you’re in the “collection” phase. Usually the collection phase happens when we are just starting out and gathering as much as we can on our ancestors, or it may happen when you are starting a new client project or a new project for yourself that you haven’t researched before. The collection phase is when you are gathering as much of the “low-hanging fruit” as you can, the easy to find documents and sources to advance your family trees.
What do you do when you get to a point of resistance, commonly called a “brick wall” in our field. We invariably get to a point where the low-hanging fruit doesn’t identify that next generation, for example, and we have to do some extra work to determine who the parents are. This is where we can really put our skills to the test, or learn new skills and methods if that is the case. Part of this is effective research planning.
I have an Evernote template that I use for more directed research. This same sort of “set up” will work in Word or Excel or your note-keeping tools of choice. The most important thing is that you figure out what works best for you, for your way of thinking, and how you view your findings.
My Evernote Research Plan/Log template.
I fashioned this template after one I found online, probably from Cyndi of Cyndi’s List (click here to see all her Evernote templates.) I almost always end up changing or adapting them to fit the needs of whatever I am working on. Do not try to shoehorn yourself into something that someone else created. If that doesn’t work for you, change it until it does. You can recreate something similar to mine, find one that works from Cyndi’s list, or create your own in Word, Excel, or the program of your choice.
When I set out to work on a “brick wall” in earnest, I will start one of these “plogs” to help me get myself and my thoughts organized, and ready for research. Next time, we will look at this template filled in for a project I am currently working on so you can see how I use it in actual practice.
In the previous post, I discussed two “phases” that I saw in myself in terms of my genealogical development. There is the “collection” phase where you are gathering the information for your family tree, perhaps regardless of a family line or specific problem. When I started out, I spent hours and hours at libraries and on websites gathering what I call the “low-hanging fruit” or the easier to find records for family groups and my direct line ancestors. Those records often include censuses, death certificates, obituaries, tombstone photos, etc. Depending on the area where your research is located, some of these may be easier than others.
In terms of research planning when working in the “collection” phase, when I was in this phase, things were a little bit different than they are now, but the planning portion is pretty much the same. The difference is in how we might access those records and collect them. I started research in 2000. Ancestry as a research website was in its early stages so a large portion of my early collecting was done at local public libraries, local cemeteries, the Family History Library, the local branch of the National Archives (where you could view the census on microfilm before it was digitized and available online).
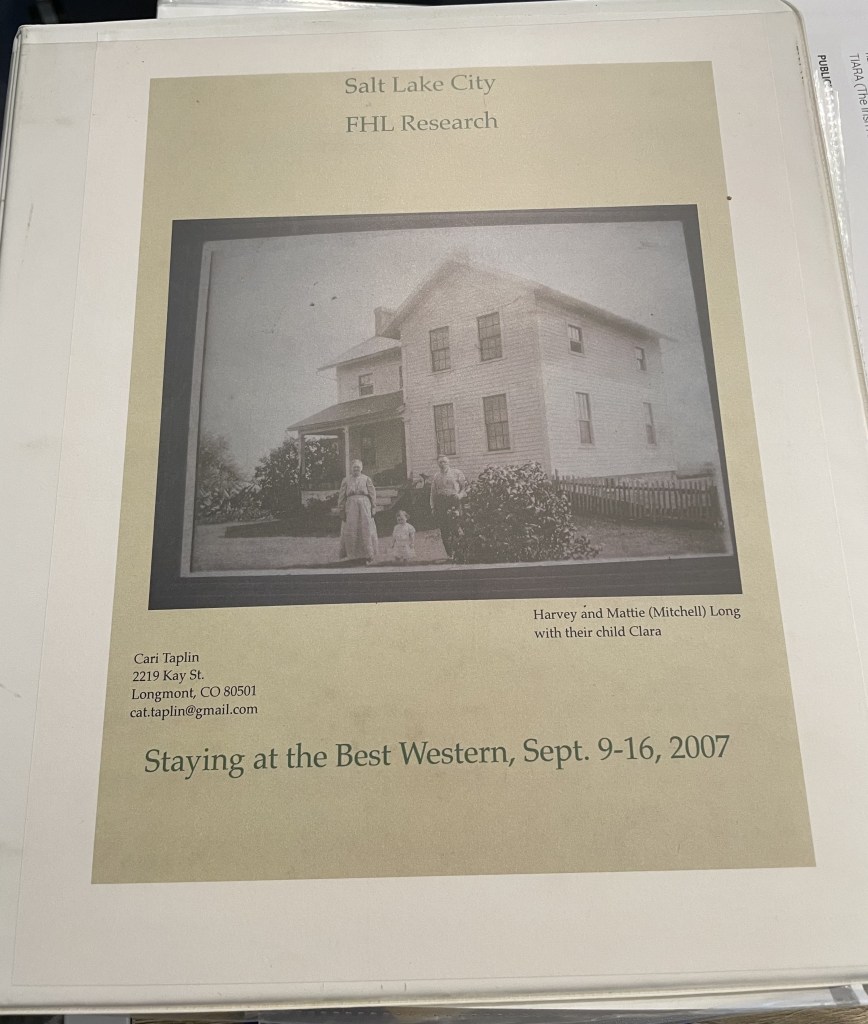
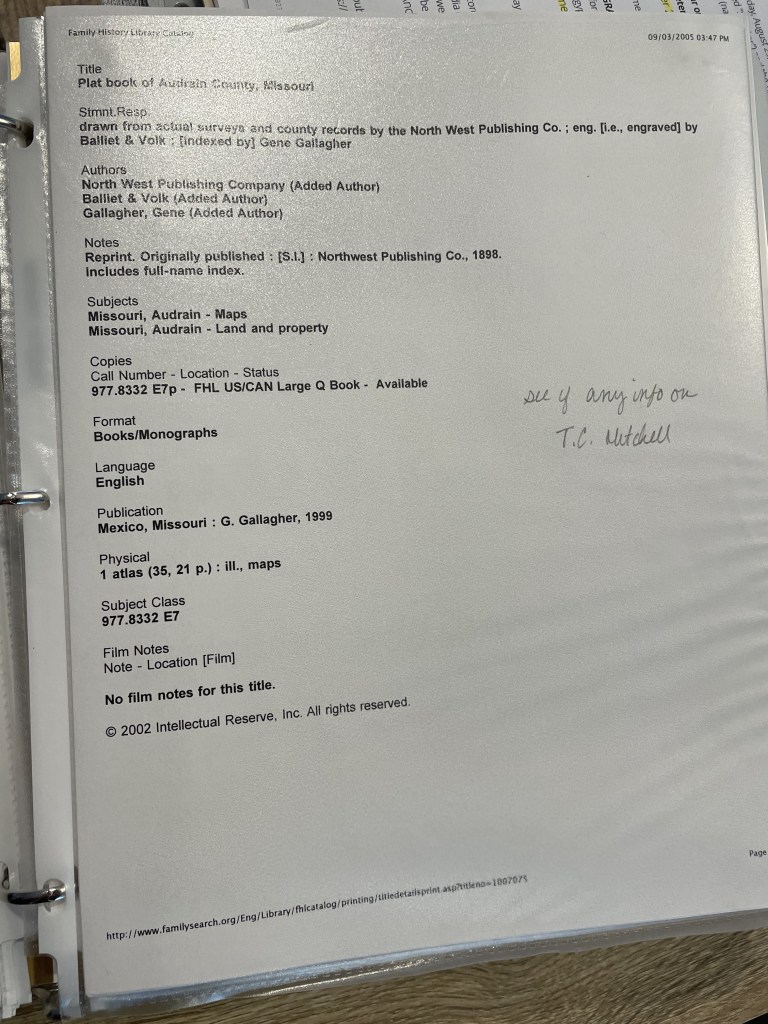
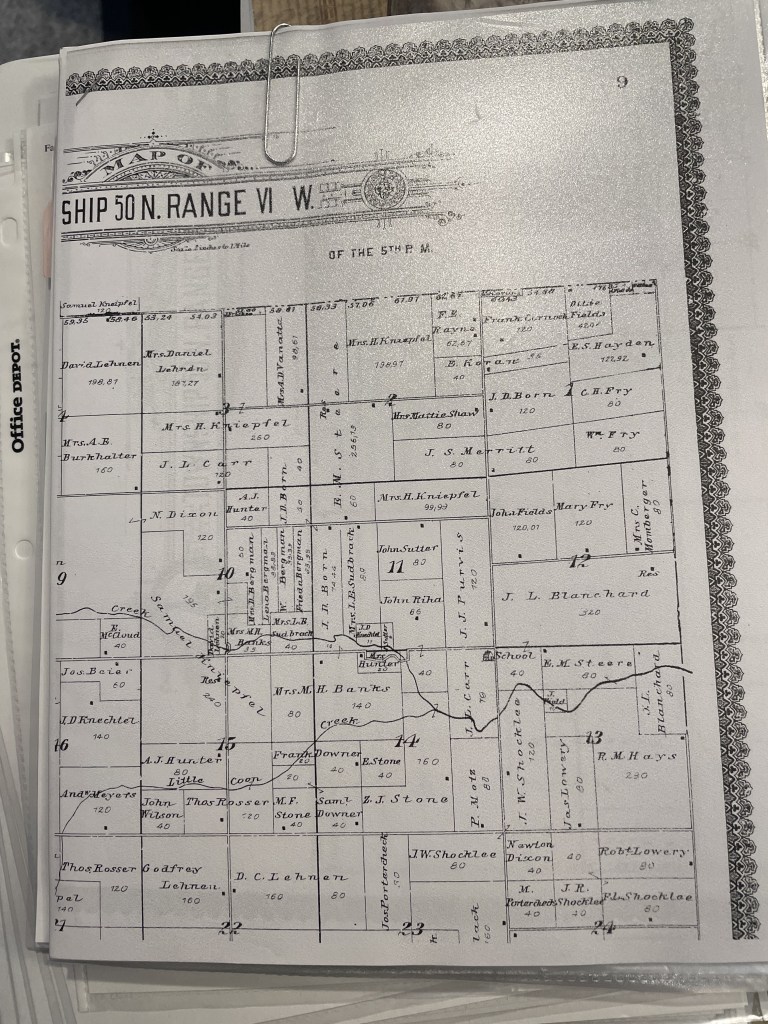
When preparing to visit any library, I visit that library’s catalog to determine what sources I plan to use to find records for my family tree. Remember, I’m in the “collection” phase here, so these will be a lot more broad-purpose searches. My tasks might be something like “find the obituary for Thomas Mitchell” or “Find Thomas Mitchell in the 1900 census.” When I started, I would print out that catalog item and put it in a sheet protector in a binder specific to that repository. Then, when I visited the repository, I used my binder as a guide or a to-do list and would complete each item. Back then, you made photo copies. We didn’t have scanning or photography (well not conveniently), when I started. I would tuck the photocopies into the sheet protector that contained the original catalog entry. Keeping the photocopy and the catalog entry together allowed me to go back later and create the citations for the items found.
My binder from a 2007 trip to the Family History Library. I do not live at that address any longer.Print out of catalog page from the FamilySearch CatalogPrintouts of Items Found from the FamilySearch Catalog Entry Above, tucked into the sheet protector.
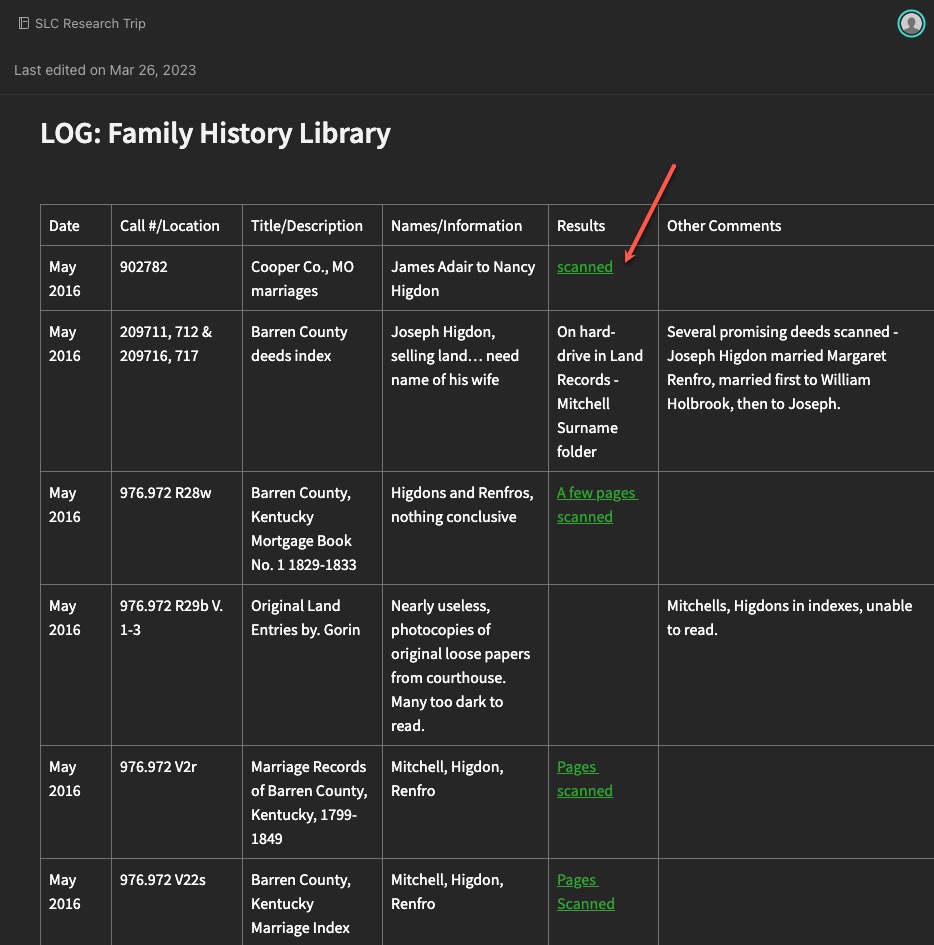
Ok, so that isn’t exactly the same system I used today when I’m “collecting.” I still visit the catalogs, but many items (not ALL) I’m looking for are now digitized and available online from home. So, my plan consists of a spreadsheet or Evernote note with links to databases, and the tasks, rather than a printout. If items are only available at the repository, I still copy the link into my plog, and then retrieve it next time I’m at that repository. I then collect my “copies” (scans or phone photos these days) and add them to Evernote where I can link them to the “plog.”
Evernote note showing a “collection” example with links to scanned items (red arrow).The scanned item from the “scanned” link above.
You might still like to have printouts. You might also prefer to only work in digital. And you might be a combination of both like I am. That doesn’t matter. What matters is that you have a system for keeping track of what you want to research, what you expect to (hope to) find in a particular source, and then what you found.
Next time, we will look at some examples of more directed research plogs based on specific research questions and projects.
Creating a research plan takes a bit of practice. There are differing opinions on just how much planning one should do for a given research question. I have seen long lists of sources one should consult when working on a project. Great, long lists that identify every source you may ever think of (even if it doesn’t apply to a particular ancestor or situation), like this one from the Puget Sound Genealogical Society. Others have taught that the plan should only be a few items, because what you find in those items may dictate where you look next. Some example research checklists, forms, and templates can be found here on Cyndi’s List.
I’ve discussed before that I think (at least in my experience) that are two phases of a genealogists “life.” The collection phase comes first; gathering as much as you can. In this phase you find all of the “low-hanging fruit” such as census records, vital records, newspaper articles, obituaries, and so on. The “easy” to find items for your ancestors. Then there is the phase that you face when the easy-to-find runs out. And not just runs out but when there are conflicts in the records you have found. The second phase I think of as the “brick wall” phase, or maybe just the “it is going to take more concentrated effort to figure out” phase.
I think the long checklist forms you can find are more appropriate for the collection phase. The more thoughtful, intentional, and detailed research plans are what is needed to get through the tougher problems. So, my point in saying all the above is this: What phase are you in? Choose the most appropriate system that works for you. I have two examples one for each “phase” that I will share both over the next few posts and discuss MY thoughts on the benefits of each.
As I have evolved as a genealogist, so has my working style, and specifically how I use research “plogs.” I’m going to share some of my earlier plogs… no judgement. I mainly want to demonstrate how I used to do it, and how I’ve improved, at least in terms of keeping track of my thoughts and research.
My earliest logs were on printed paper. I’m sure I have copies of them, but I’m having some remodeling done in my office and my “stuff” is in piles under drop cloths and I can’t get to them right now. If I can before this series is over, I’ll snap a few photos. For now, let’s look at some of my earliest digital versions.
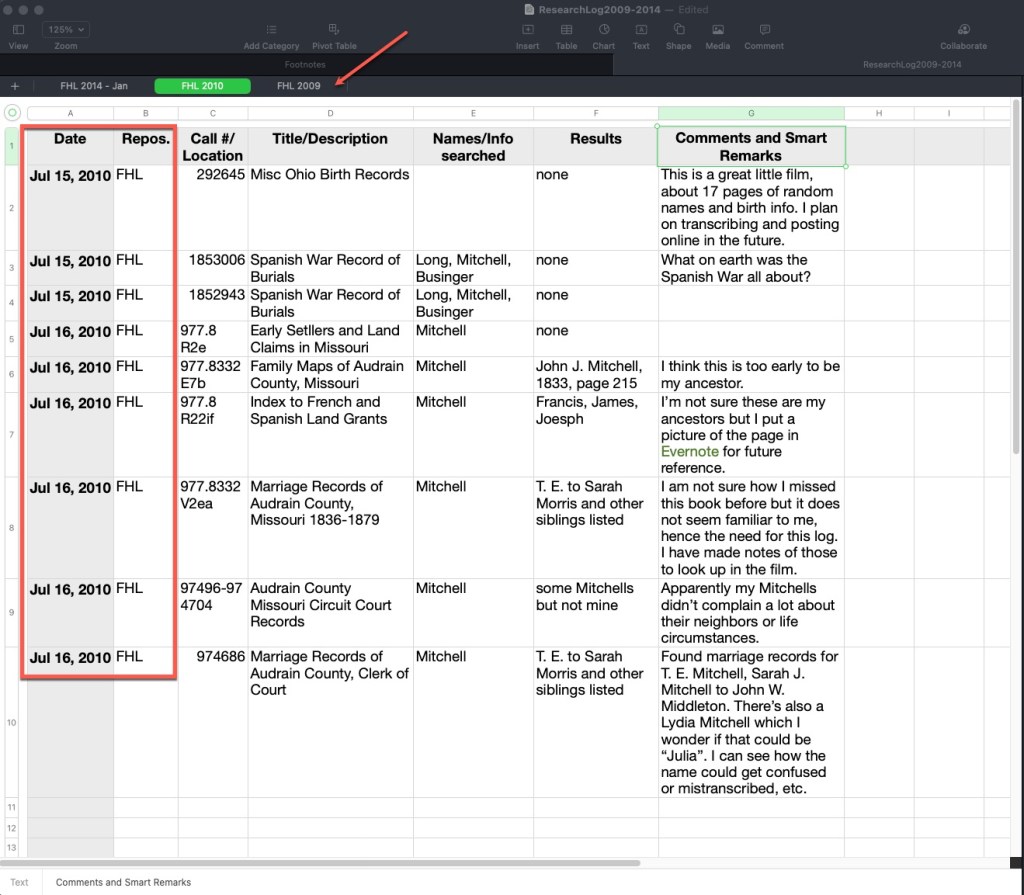
The following plog was done on a spreadsheet. I use a Mac and the Numbers spreadsheet program. It works very nearly like Excel. Across the top you can see tabs indicating the repository and the year. The column headers have not changed a lot over the years. I usually indicate a date, the repository, the call number/film number/manuscript number if it is in an onsite location, or a link and database title if it is an online source, the title or description of that item, the names and parameters used to search, the results, and then any comments, ideas, analysis, etc.
Example Research Plog by Author, using Mac Numbers Spreadsheet
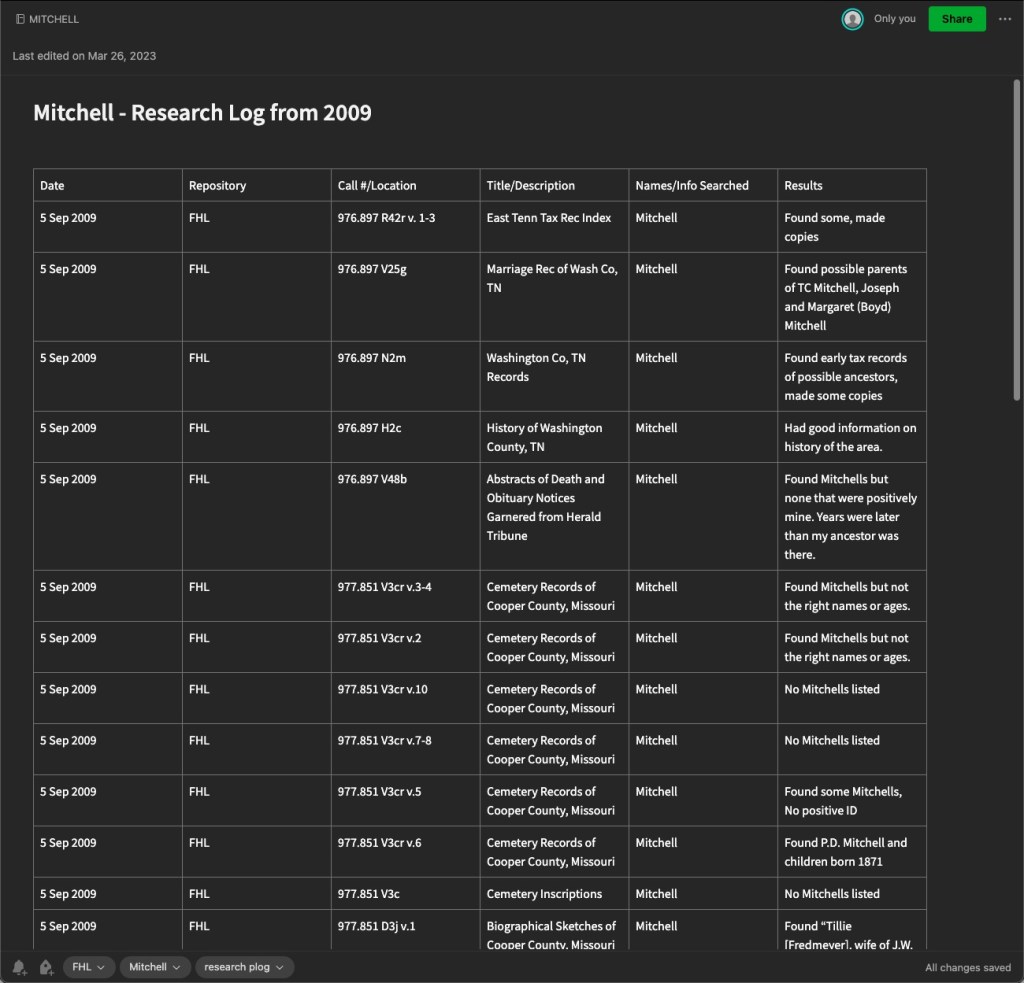
Here is another plog I’ve created, this time in Evernote. Other note programs exist and you may prefer. This is an example of one from 2009, you’ll note very similar column headings. You’ll also note that I didn’t do as much thought-process writing in the results column. I mostly noted what I found. In newer plogs in Evernote, I generally take photos of the pages in books and store them right in Evernote and then link the results in this log to those separate notes so that this log would be much more useful. Stating “Found some, made copies” doesn’t really help if I have to track down those copies. Earlier in genealogy time, we made a lot of paper copies. Now we can take digital photos and link them to these logs.
Example Research Plog by Author, using Evernote
The advantage to a note-taking software like this is that they often are shared to the cloud and you can access them on mobile devices as well as your computer. Of course, a spreadsheet can do this as well if you store in Dropbox or other file sharing service. Note-taking apps generally work more seamlessly, in my opinion. On these things, my advice is to always do what works best for you. It makes no sense to spend valuable research time trying to use someone else’s system if it isn’t working for you. If you have a favorite system, keep using it! Just adapt and evolve.
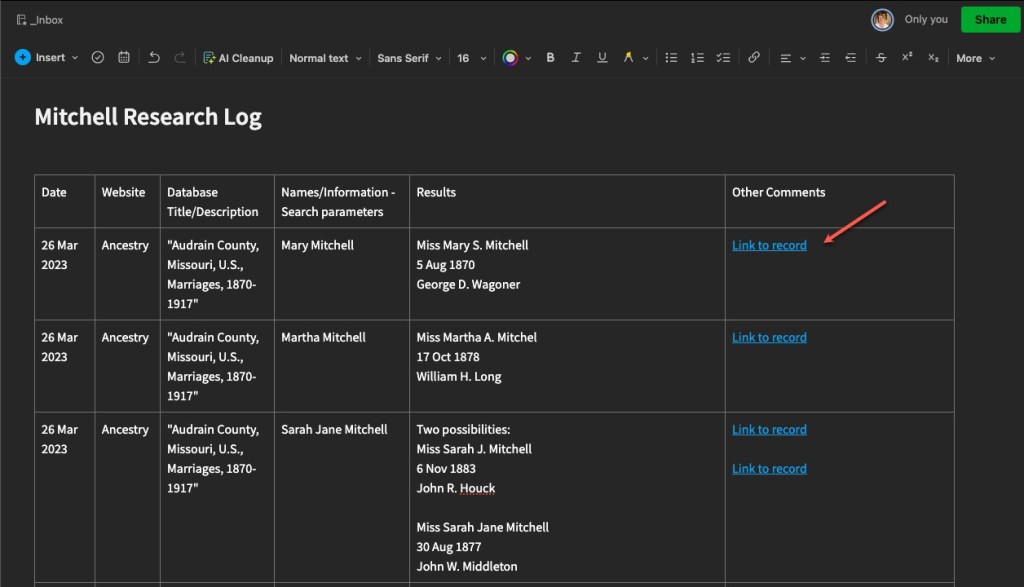
Here is another, more recent plog, showing linked records. These are links directly to the item in online databases, in this case Ancestry. With Evernote, and other note-taking options, you can link to other notes within the software.
Example Research Plog by Author, using Evernote, demonstrating links
You can, of course, use a word processor to keep a plog as well. Below is an example of one I did back in 2014 as I was experimenting and evolving.
Example Research Plog by Author, using Word Processor
The above example of a word processor plog, I tend to use for client work, but also in my own personal research when I’m trying to “round up” all of the research I’ve done and write more analysis from the findings I collected in the plogs I have made in Evernote or a spreadsheet.
Most recently, I’ve begun doing this “round up” more frequently, writing a kind of informal client report for myself. I think of it as writing notes to my future self telling me what I was thinking at the time, what I thought then that the next steps might be, and future tasks for myself. This has really helped me because my memory is getting worse as I get older (and busier) and I always think I’ll remember what I was doing, but then months go by and I’ve completely forgotten what I was doing.
Next we will talk in more detail about the plan part of the “plog.”
Last time I discussed the “why” of using research research “plogs” (a combo plan/log). Now we will look at some of the “how” for creating a plog that will work for you. The first thing you’ll want to decide is how you’re going to create yours. I have ideas and suggestions, but ultimately, it will be up to you to decide what makes sense for your workflow.
Over the years, I have done this in many different formats. My first research plogs, were just logs (not plans), and were written on paper! I don’t have any of those old plans at my finger tips (if I even kept them at all) or I would should you a picture. You can find PDF forms that you can print and fill in if paper is the way you’d like to go. Check out this category on Cyndi’s List for some options.
Now I utilize digital options for my research plans/logs. The main advantage to this is that they are searchable. Once your plog gets lengthy, and you want to check something, being able to do a keyword search with the “find” option on the software you use is so valuable. The other advantage is that digital plogs can be mobile. If you’re using paper, you have to make sure you don’t forget it when you head off on a research trip. Whereas, depending on the software you use, it can be accessed via your laptop or mobile device if you’re syncing to the cloud.
Options for plogs:
Paper forms
Spreadsheets
Word processing documents or tables
Note-taking software, I use Evernote but others exist
The other aspect I want to share about how I use plogs in the setup stage, is by project. My plogs are based on one project, and those projects are based on a research question.
Early on, I made logs that had to do with a repository visit and nothing at all to do with a particular project, or even a surname. Those got very clunky and unwieldy and just not very usable. They were not organized in a logical way that I didn’t not really discover until later when I went to review what I had done for one particular surname or project.
So I evolved. And that’s what we do, right? We try things, make mistakes, make adjustments, and try again. I guarantee I will likely change how I use my research “plogs” in the future. But for now, they are working for me. We will dive into some in more detail next time and discuss their pros and cons for different types, styles, and versions.
I received the following announcement from the Institute of Genealogy and Historical Research (IGHR):
I am delighted to share with you that Cyndi Ingle has been appointed as the Executive Director of the Institute of Genealogy and Historical Research (IGHR). As an internationally known genealogy educator and innovator, she is well positioned to lead the Georgia Genealogical Society’s IGHR into the future of genealogy education. She will have the full support of GGS leadership as she does so.
Cyndi Ingle really needs no introduction, but for those of you not familiar with her work over her 40-year genealogy career, please see below.
IGHR 2023 was a great success, and I thank the volunteers who made it so, particularly the Advisory Council, the Course Coordinators, the faculty and staff, the Steering Committee volunteers, and the members of the IGHR 2023 Executive Committee, Lisa Delgado, Cynthia Harrison, and Karen Molohon, for their dedicated and selfless service.
We look forward to welcoming you (and your friends) to IGHR 2024, which will be held virtually the week of 21-26 July, 2024. The course list will be announced later in the fall, and registration will begin in the spring. If you have feedback or suggestions for GGS or IGHR, please email me at president@gagensociety.org.
Let us all give Cyndi a warm welcome!
Madelyn Nix GGS President
INTRODUCTION TO CYNDI INGLE
Cyndi Ingle
Cyndi Ingle created the award-winning and globally recognized CyndisList.com, a free categorized list of more than 320,000 online resources for genealogical research. She is an internationally-known guest lecturer for genealogical society meetings, conferences, seminars, institutes, webinars, and study groups.Cyndi is a past member of the board of directors for the National Genealogical Society and has also served in several capacities for local, national, and professional genealogical organizations.
Her particular interest is combining traditional methodology with organization, computers, software, and the Internet. She is one of the co-creators and admins for the popular Facebook genealogy group, The Genealogy Squad. Cyndi, currently a columnist for the Association of Professional Genealogists Quarterly (APGQ), has authored numerous articles for genealogical publications and three books. She coordinated courses for the Genealogical Institute of Pittsburgh (GRIP) and the Salt Lake Institute of Genealogy (SLIG). She has attended dozens of conferences and institutes including the Institute of Genealogy and Historical Research (IGHR), the Salt Lake Institute of Genealogy (SLIG), the Genealogical Institute of Pittsburgh (GRIP), and the National Institute on Genealogical Research (now Gen-Fed).
When I was a “baby genealogist” I did not know about research plans or logs (I call them “Plogs” by the way) for quite some time. Then I heard someone discuss them (can’t recall exactly where or who, far too many years have passed) and I really tried to incorporate them into my research routine.
You know that phenomenon where you’ll hear about something but your brain isn’t ready to use it or understand it. And then you’ll hear the same thing years later and that “Ah ha! It makes so much sense now!” happens? That is what happened with me and research plans and logs.
Why should we even bother? They can be somewhat tedious and take up valuable research time!
Here are some of the reasons why I use research “Plogs”:
I can avoid repeat searching. If we have limited research time, why waste it conducting a search we’ve already done?
I can double check my previous search parameters to determine if I do need to repeat some searches. Databases change, we learn about new names or items to search for, etc. If we keep good notes about what we searched for before, we can determine if we DO need to search again.
Plogs allow me to collect the data I need for creating citations.
Plogs allow me to analyze information and evidence while I’m looking at it.
I can put a “bookmark” in a research project if I keep good notes in my Plog.
In this series, we will look in-depth at how I use research plogs, my evolution using plogs over the years, some of my best tips, dos and don’ts, and ideas for effective, efficient research.