When I was a “baby genealogist” I did not know about research plans or logs (I call them “Plogs” by the way) for quite some time. Then I heard someone discuss them (can’t recall exactly where or who, far too many years have passed) and I really tried to incorporate them into my research routine.
You know that phenomenon where you’ll hear about something but your brain isn’t ready to use it or understand it. And then you’ll hear the same thing years later and that “Ah ha! It makes so much sense now!” happens? That is what happened with me and research plans and logs.
Why should we even bother? They can be somewhat tedious and take up valuable research time!
Here are some of the reasons why I use research “Plogs”:
I can avoid repeat searching. If we have limited research time, why waste it conducting a search we’ve already done?
I can double check my previous search parameters to determine if I do need to repeat some searches. Databases change, we learn about new names or items to search for, etc. If we keep good notes about what we searched for before, we can determine if we DO need to search again.
Plogs allow me to collect the data I need for creating citations.
Plogs allow me to analyze information and evidence while I’m looking at it.
I can put a “bookmark” in a research project if I keep good notes in my Plog.
In this series, we will look in-depth at how I use research plogs, my evolution using plogs over the years, some of my best tips, dos and don’ts, and ideas for effective, efficient research.
We are going to wrap this series up with a few odds and ends that didn’t fit in elsewhere.
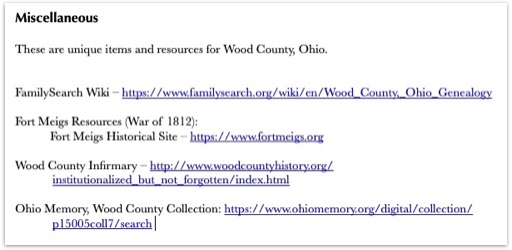
First, I have a “Miscellaneous” section for items that are unique to the locality I’m creating a guide for. In this section you might also put links for that locations FamilySearch Wiki page as well as miscellaneous resources that just didn’t fit elsewhere.
Miscellaneous section from my Wood County, Ohio Locality Guide
Second, utilize things that make your life easier in terms of creating your locality guide. I use a screen capture tool called “Snag-It” from TechSmith that not only takes screenshots but allows you to draw arrows, underline things, highlight, and put boxes or circles around important items. I use this to add visual aids to my locality guides as needed. Also, be sure to use active hyperlinks when adding links to your guide. This allows you to simply click and go to websites rather than having to cut and paste the links. Most programs can recognize a link and will make it active automatically. However, if that is not happening, usually if you highlight the link and then right click on it, you will get an option to add the hyperlink.
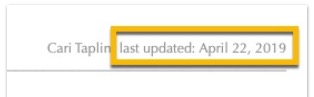
Third, make sure you are noting when the last time you updated the document. Sometimes, I work on my guides, then do the research project, and then the guide sits there for a year or two (or more) while I work on other things, and before I come back to it. It helps me to know how out of date that guide is. If it has been a long time, I might spend a half an hour making sure the links work, and updating what has been digitized at FamilySearch, and so on. I add the “last updated” date in my document’s header so that it shows up on every page.
Last updated example.
Here is a summary of the resources I use to build my guides:
Cyndi’s List
FamilySearch Wiki & Catalog
Map collections
University websites
Subscription sites
Google Books, Internet Archive
Specialized museums
Repositories and libraries
Local genealogical societies
Government Websites (county courthouses, etc.)
Library of Congress
State historical or genealogical society
State archives
And so on…
Consider helping others with the information you gather for your guide. There are places you can share the information, especially if they don’t already have it! Consider submitting any new links to Cyndi’s List, updating the FamilySearch Wiki, or sending your completed guide as a PDF to the locality’s genealogical or historical society or local public library.
To wrap up, there is no right way to do this. You can create this any way that works for you in any format that works for you. You might use a word processor, a note-taking software such as Evernote, a spreadsheet, or paper and pencil! Your categories may be different than mine, the data you collect may be different, etc. It does not matter. The main point of a locality guide is to help you with the “pre-research” so that your research time is more efficient.
You never know where your genealogical research will take you. Creating a locality guide for each new area before you begin your research will save time in the long run by making your research more focused and making you more educated about the new location.
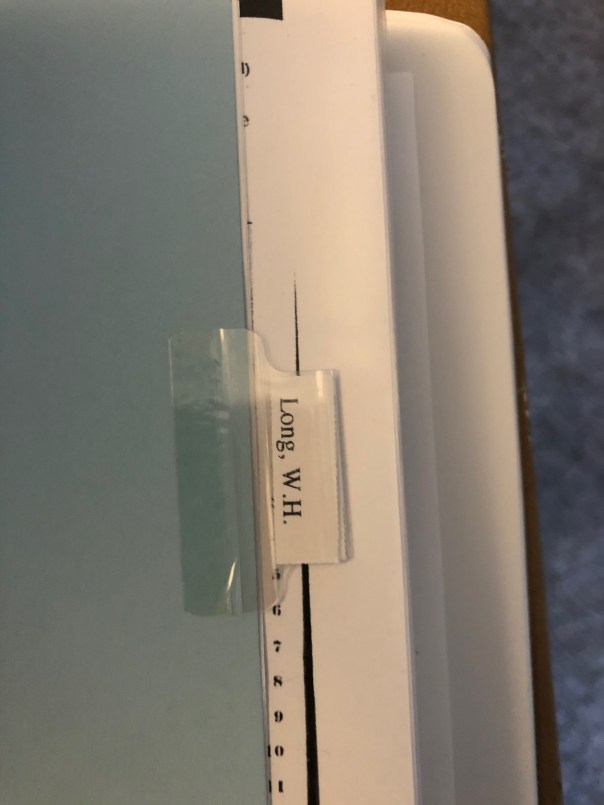
As I am working through George Long’s digital folder and corresponding binder, I like to include a couple of documents with the binder so I can see at a glance what is going on without opening more than the front cover. I use the white binders with clear covers so you can slip in papers in the front, back, and on the spine. For the spine, I title the binder: last name, first name of main couple, birth and death years, and a list of their children, noting which child will have their own binder. George Long’s current binder spine is on the left.
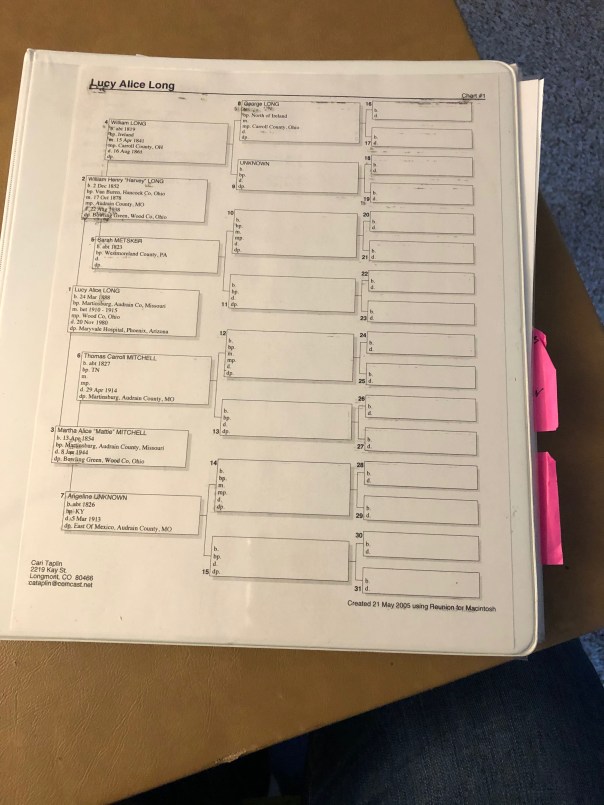
For the back, I like to include a simple cascading pedigree chart, printed from my desktop software, that shows George’s place in the grand scheme of things. At a glance I can see what generation I’m working on.
For the front, I print a family group sheet from my software that shows me at a glance, everything I know about the family group.
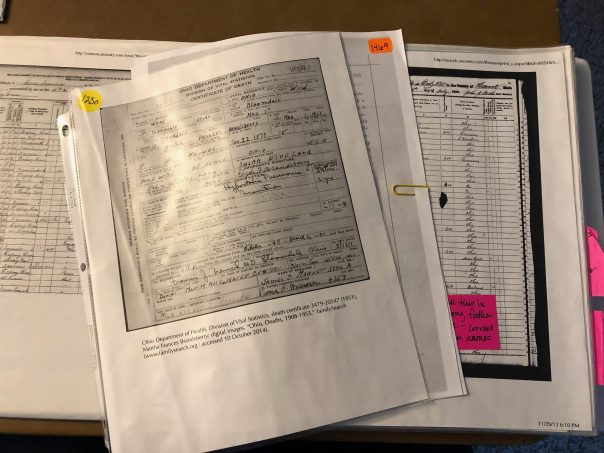
Inside the binder, usually in a plastic sleeve, I have a word document that is simply a timeline of the documents that are held within. This document has a couple of purposes. First, it acts like a table of contents. I can see quickly what documents I have for a given ancestor. Second, since they are in chronological order, they create a quick timeline for the ancestor’s life. I can see where there might be gaps and where more research could be done.
As new information is gathered, these documents are updated, reprinted, and replaced in the binders. I don’t do this for every single little change, but after four or five major additions to the information added to the binder, I’ll reprint these documents so that everything is up-to-date.
Years of doing research but not organizing along the way, has been a mistake. Getting the binders organized and up-to-date will allow my research time going forward to be more efficient. For a fantastic webinar on keeping yourself organized as you go, check out Cyndi Ingle’s presentation at Legacy Family Tree Webinars. (A subscription is required, but consider clicking this affiliate link to get a subscription. It’s the best inexpensive but high-quality education money can buy!)
Genealogy is a work in progress. You know that, right? It is never finished, can always be refined, one more thing can be researched, and so on…forever.
I did make a little progress in organizing my George Long binder. But as I was doing that, I discovered that I really needed to work on his digital folder so that it would match up with the binder, and then I could work on both at the same time as I work through documents.
My document process is (not necessarily in this direct order, but all of these things are done with each document):
Look at the document. Decide to whom it belongs.
Make sure the document is scanned if it wasn’t already digital.
Affix a citation to the image. If it is already printed I sometimes make a label to stick to the printed document. If it is possible, I use my word processor (Mac Pages) or Snag-It to digitally affix a citation to the image. I then reprint if necessary. But by whatever means, I get a citation on that document.
In my genealogy software (Reunion) I input the data if it hasn’t been already. I link the digital image to the source in the software.
I put the document in a plastic sleeve and put it in the correct location in my physical binder.
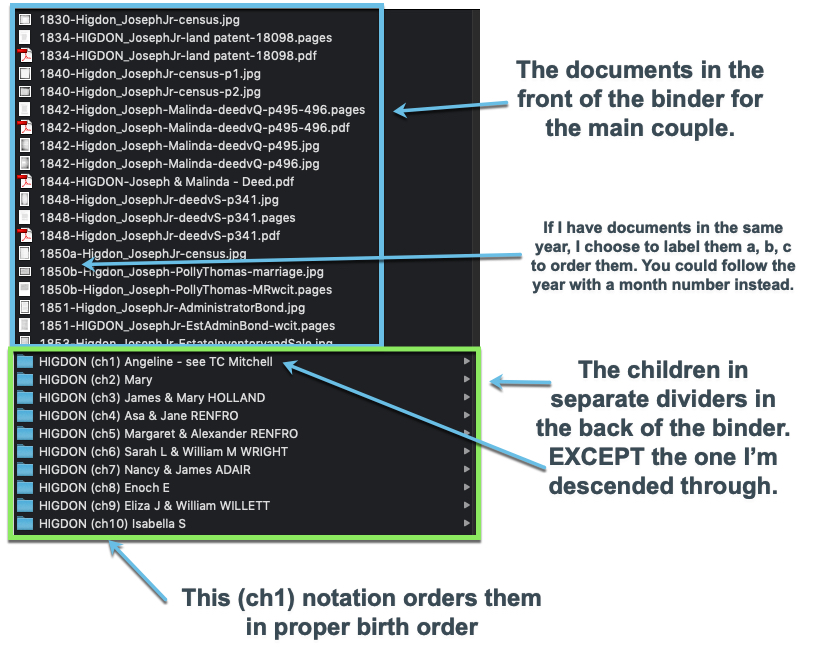
As I was working on George Long, I kept getting hung up when I needed to put the document in the digital folder. So, I took the time to get George’s folders titled and organized properly.
My Long Family Digital Folders
The digital filing is not complete, by any stretch. You can see some “Brandeberry” files that I need to put in the correct location. This was a second marriage for daughter Martha and I just need to decide how I create second marriage folders. Right now, I can think of two solutions. One, create a sub-folder within the folder titled “LONG (ch8) Martha & Jacob Hentges” that is titled “LONG Martha & BRANDEBERRY – second marriage.” Or two, create a folder “LONG (ch8) MARTHA & John Brandeberry” and leave it in the same level of folder. What I don’t recall and will need to investigate is did that second marriage produce any children? Are there any documents I need to store for John Brandeberry? If I don’t have much of anything or if they had no children, I may not make a digital folder. I may just put the documents in the Jacob Hentges folder. (I would still enter the data for this second marriage in my genealogy software, of course.)
These the kinds of decisions you have to make when you are getting your files organized. How do I do it? You have to decide what is going to work for you and stick to it. I will get back to organizing the paper files now that I have this organization system ready to go. I learned that I can’t think of it as two separate projects/systems. They really are each part of the larger system.
I’ve been slowly, ever so slowly, making some progress on my Spring Cleaning projects. I’ve made a small amount of progress scanning while also watching some Netflix (Hannibal, in case you’re wondering). And I’ve started working on one of my project ancestors, George Long and his family group. He came to the U.S. from Ireland (where? “North Ireland”), got married, had a couple of kids, and then was killed in a machinery accident in 1855 at a mill in Gilboa, Putnam County, Ohio. I’d really like to know where in Ireland he is from. Well, I’m not going to figure it out with the state of affairs that is his binder, digital folder, his entry in my Reunion file, and so on… it’s a mess, to say the least.
The George Long binder has loose pages I haven’t fully processed, sticky notes with to do items, no separate tabbed sections for all of the children… it’s a mess, as I said. So, my next project is to just get this binder organized physically. Then we will delve into the digital side of this project. As a forewarning… none of the digital records are organized either!
I have a whole system that I use to organize my genealogy. It is a hybrid paper/binder and digital system. This may not work for some. Some of you I know think it is ridiculous to keep paper files these days. but I just like to sit down with my binder and “read” about my ancestors as if their binders were their book. My binders also act as a visual timeline that just works best for the way I visualize and think about research.
I’ve said it before and I’ll say it again. The important thing is to do what works best for YOU.
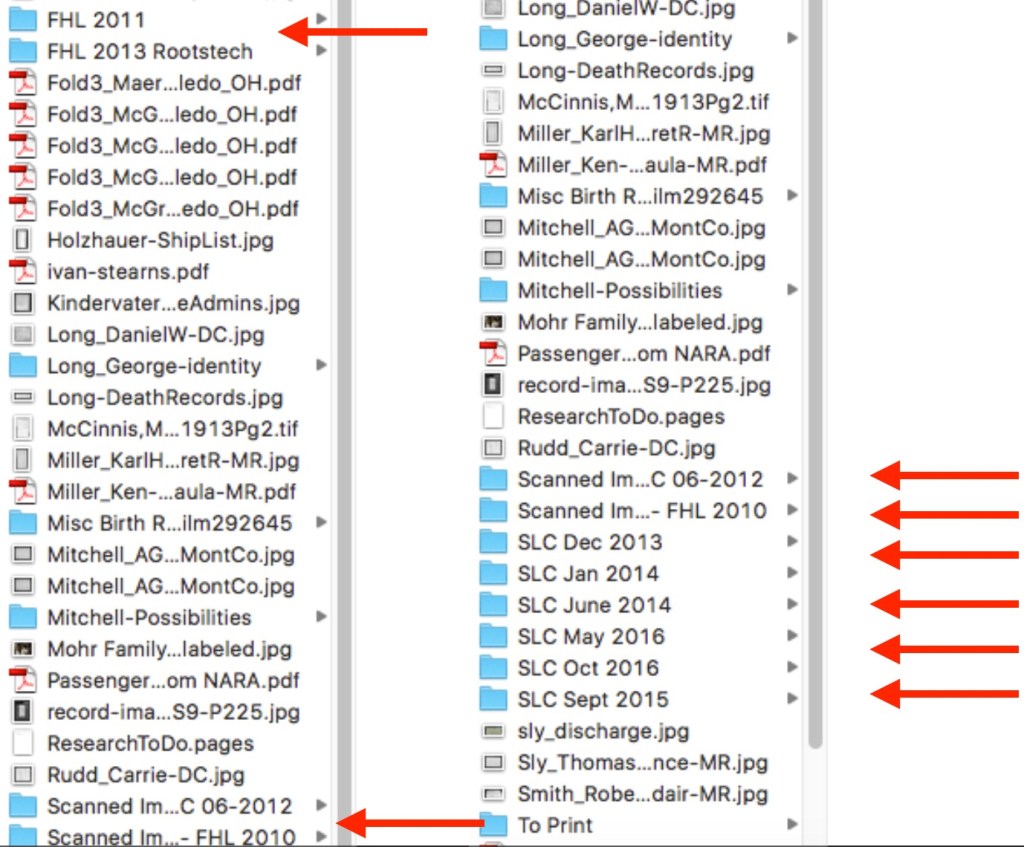
Anyhow, after all of this scanning and sorting and going through my hard drive, I know I have some family digital files that I have not made match my binder system. I started doing this a while ago (several years now) and have just worked on it as I worked on a family project. But I think it might be time to be more methodical about it. (Here’s the blog post about that system.)
The digital corresponding system to my binders.
So, this will take many months to do, but I am going to go through each one of my paper binders and make sure its corresponding materials match in my hard drive. Wish me luck!
I don’t know about you, but my hard drive is something of a mess. I tend to take research trips, scan and photograph a lot of documents, and then never process those documents I scanned. I am not the only one am I? I mean, I have things I took pictures of from back in 2007 when I went on a trip to New Hampshire with my grandma. If I do the math correctly, that was about 14 years ago! I bet I will not know or remember what I was thinking or why I took a photo of that document or the page in book, let alone if I took a photo of the book’s title page!
I need to clean all of that up. Additionally, my hard drive just needs a clean out and organization session (or two or ten).
This needs some major TLC!
So, for the next week or so, when I have a moment, I am going to go through a folder on my hard drive that needs some TLC…and I’ll keep doing that until I get it done.
Last week I described why a research plan/log or PLOG, is a good idea. This week, let’s get into some of the nitty gritty of what a research PLOG looks like.
First, you will want to have several research plans. They should be based on a particular project you are working on. Remember, we are past the “collecting” phase and are now into the FOCUSED phase of our research. (Refer back a few weeks to the post on Getting Focused.) Your research plans and logs will want to reflect that focus. I have a research plan for each individual project I’m working on. And my projects are generally driven by my research questions. So, I have a PLOG that holds research tasks and findings relative to a particular research question I am trying to solve.
You can create these PLOGs in any platform that works for you: word processor, spreadsheet, Evernote or One Note, Scrivener, and so on. Even paper. I’m not here to tell you which one to use. But I will share what I use: Evernote. Now there was a recent Evernote update that had a lot of people upset, they didn’t like the changes. Well, who likes change? I know I don’t. I am still working with the new update and forming my opinions, but so far, everything has been working ok with a few minor hiccups.
I like Evernote because of its ability to sync between my laptop, my phone, my iPad, and a web version, so I literally have access anywhere I have the internet. I can also access my notes offline as long as I synced everything before I left the land of the internet. It also acts like a word processor and I can add tables, images, links to other notes, and more. I can also search my notes by keyword or tags (if I added them).
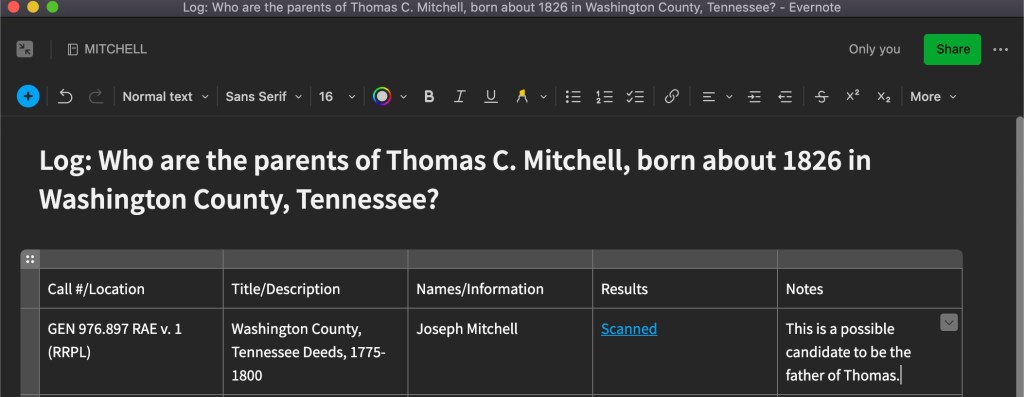
When I create a research plan/log in Evernote, I put the research question at the top so that I remain focused and my notes are categorized and organized. I then have a table with the following column headings: Call#/Location, Title/Description, Names/Information I’m looking for, Results (notes, or a link to another note that holds the scanned images), Notes reflecting my thoughts. See the example below:
Screenshot of my new project’s PLOG to identify the parents of Thomas C. Mitchell.
I have several variations, and they change depending on circumstances. Sometimes I add a column for the date or the repository if it is a PLOG that covers many repositories. Most often, I have another note that contains the actual contents of what I found, usually photos I took with my phone and uploaded to Evernote. On those Evernote notes, I will write out the citation for that item, so they are together.
I also have research PLOGs that are repository focused. Pre-pandemic, there were repositories I visited on a semi-regular basis, so as I worked from home and identified things I wanted to examine at a particular repository, I would add them to those PLOGs, with a link to the overall log for that research question.
You can do a similar thing in other platforms. In a spreadsheet, for example, you can have multiple tabs in one spreadsheet. Perhaps you have a spreadsheet about your John Smith family and organize those tabs by the particular generations, brick wall problems, repositories, and so on. Or, if you prefer word processing documents, organize your hard drive in a similar way: a folder for each surname, then perhaps broken down by generation or research problem, and then the various documents within that pertain to that problem. The sky is really the limit in terms of how you organize.
The main point with the research plan and log is that you create a system whereby you can collect what you plan to look at and what you found, in an easy, effective, and efficient way that works for you. Then, when it is time to sit down and really analyze what you have, it is all logged in one location.
If you are a longtime reader, you know a phrase I often say in this blog and when I’m presenting to an audience: “Do what works best for you. But do it!” So, go get a system set up that you think might work for you. You’ll end up modifying it as you learn and grow as a researcher, but just get started.
Every genealogist starts out in a “collection” phase. You just gather up anything and everything that pertains to your family tree, with very little focus on a particular project. I think this is the right way to do it. You have to have a base to start from and collecting and gathering important items and information from family members now, while they are still alive, is so important. But after a while, you may have noticed, you have quite a “pile” (whether physical or digital, or both if you are like me).
I’ve talked about organizing those piles before in my series about getting organized, so I won’t belabor it again. But you have to get organized before you can really move forward. OR you’ll do what I did and order the same records several times, download the same wills, search for the same obits, etc. Don’t do that. Get organized now, while the piles are small-ish, so you can be more efficient later.
Once you’ve gotten organized, you can start to see where your challenges are, the proverbial “brick walls,” or the research projects that are going to take more effort to solve. Filling in the gaps will require more structured research. When you get to this phase, it is helpful to define your research by establishing good research questions.
A good research question is a well-defined research goal. It needs to be as specific as possible, defining exactly who you are looking for, but not so specific that it isn’t possible to solve. The question has to be answerable for it to work. Here is an example from my own research:
Too broad: Who was the father of Fred Miller?
Well, which Fred Miller. There are about a billion of them in the world. And about a hundred in Wood County, Ohio in 1850. (Ok, I might be prone to exaggeration, but it sure feels like that sometimes!)
Too narrow: What is Fred Miller’s exact date of birth?
Well, for this one, we may never be able to find an exact date of birth due to record loss or just no records at all. The question may not be answerable so it is better to broaden the question a little bit. Perhaps to simply say “when was he born” which could be answered with a date range or something like “about 1805.”
Just right: Who were the parents of Fred Miller, living in Perrsyburg Township, Wood County, Ohio, who was 45 years old in the 1850 census?
With this one, I have identified a unique person in time and place, and I am asking an answerable question, “who were his parents?”
NOW, you can start planning your research to answer this question. Next we will talk about research plans and how to create and execute them.
If you are brand new to genealogy or if you want to do a refresh here are some solid starting points.
Start with yourself and work back in time.
Begin with what you know and work toward the unknown.
Start with the basics: birth, marriage, death
Add more details: military, education, residences, employment
Utilize common family history forms or genealogical software to help you build your family tree. Start with yourself and record everything about you, your spouse, kids, etc. Then work on your siblings and parents. Don’t stop with your direct line. Write down everything you know about your aunts, uncles, cousins, expanding out from your direct line.
Start in your own home. Look through your old papers for:
birth and death certificates
marriage records
diplomas
newspaper clippings
letters or diaries
photographs
funeral programs
yearbooks
I’m not going to tell you that one way is better than another. The best way to do anything is the way that works for you. I will tell you that I started with paper forms. Then I used an old Mac program that no longer exists. I’ve used a Mac since the beginning of time and so I have been a Reunion user almost since their beginning. I also use online family trees, but I treat those more like a holding place while I’m using their website. All of my research is housed in Reunion. I also print everything and organize it in my binder system.
Once you’ve exhausted everything in your own home, you’ll want to start talking to your relatives. We will discuss that next time. That’s where the fun begins!