Category Archives: Locality Guides

Building a Locality Guide: Miscellaneous Stuff

We are going to wrap this series up with a few odds and ends that didn’t fit in elsewhere.

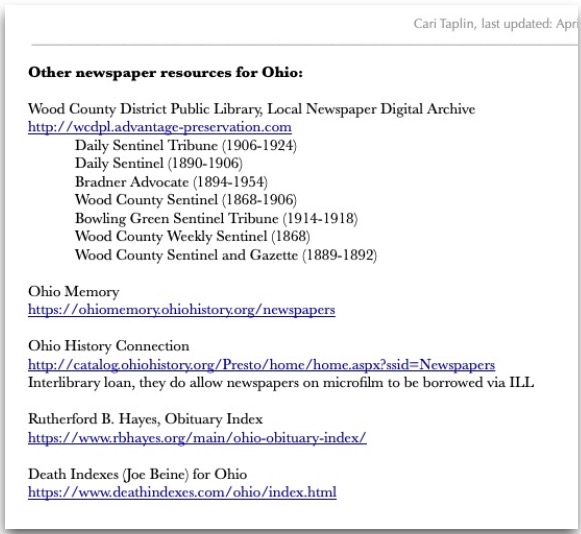
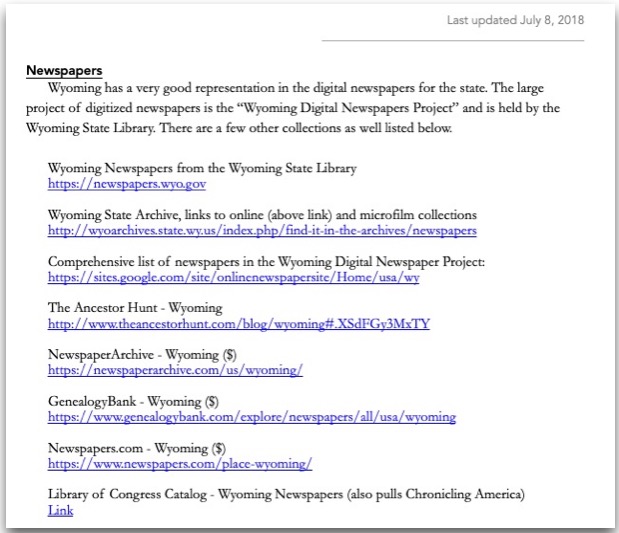
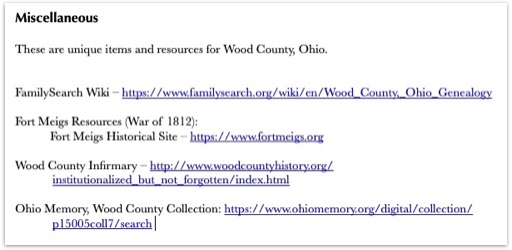
First, I have a “Miscellaneous” section for items that are unique to the locality I’m creating a guide for. In this section you might also put links for that locations FamilySearch Wiki page as well as miscellaneous resources that just didn’t fit elsewhere.

Miscellaneous section from my Wood County, Ohio Locality Guide

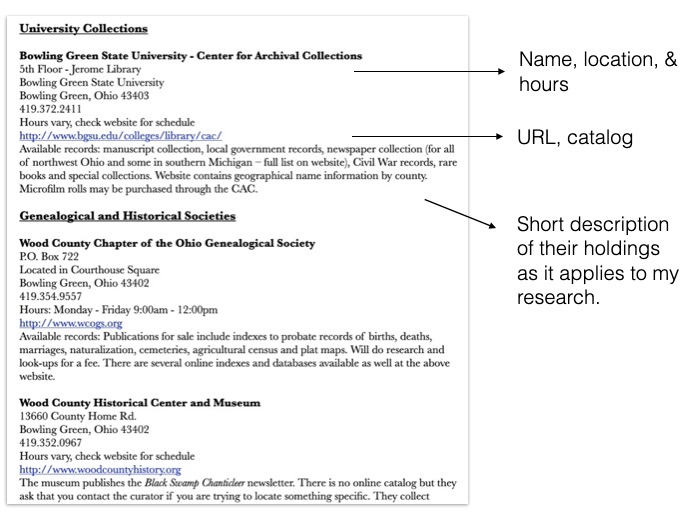
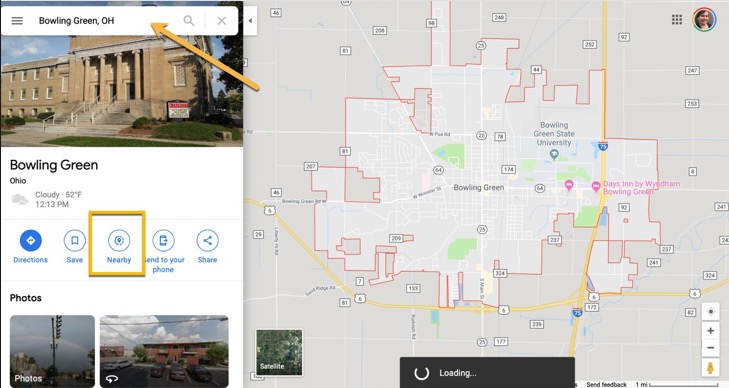
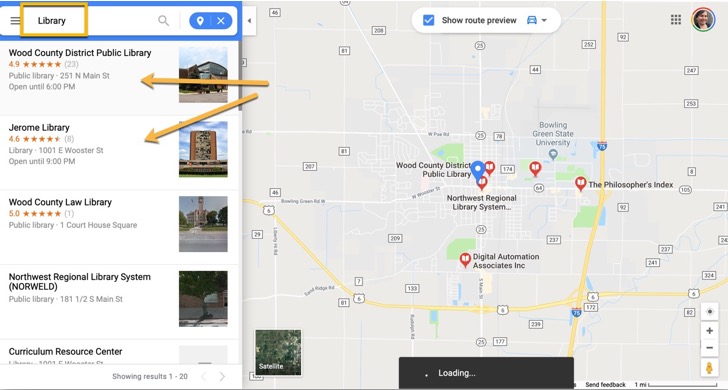
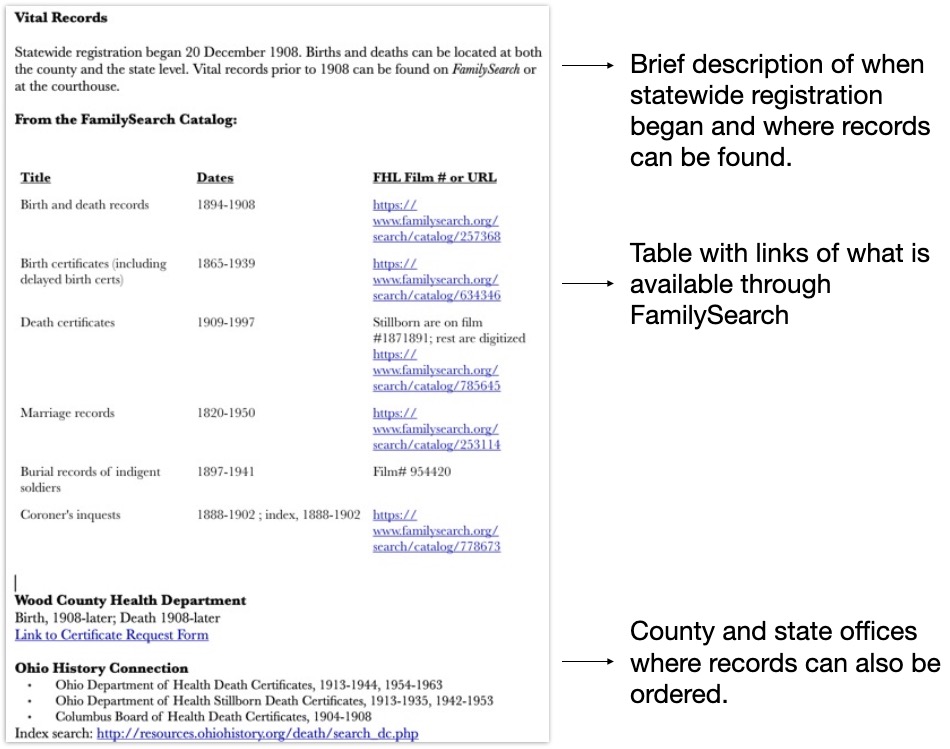
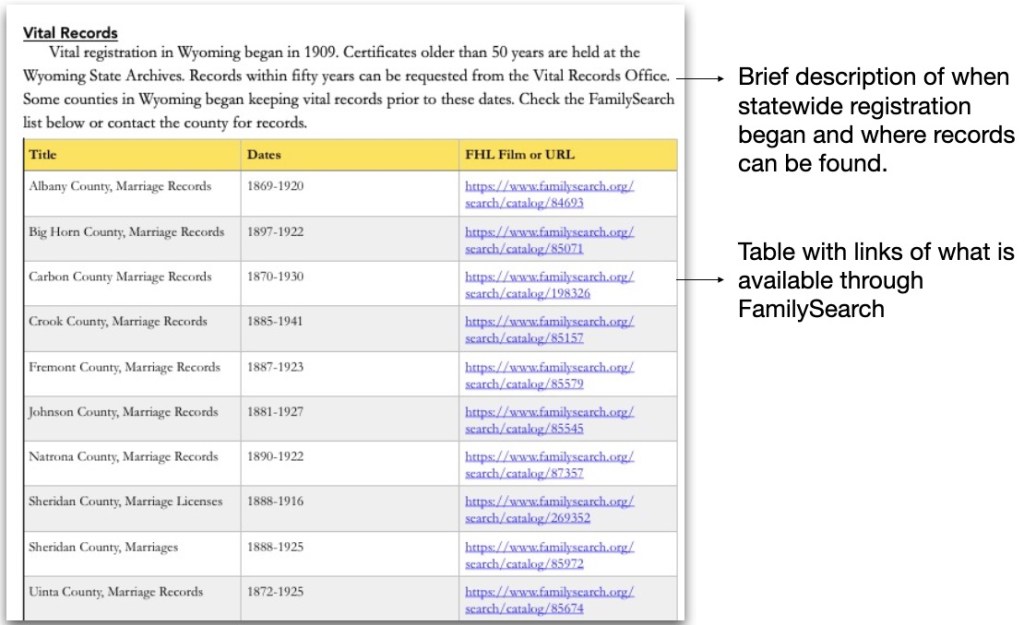
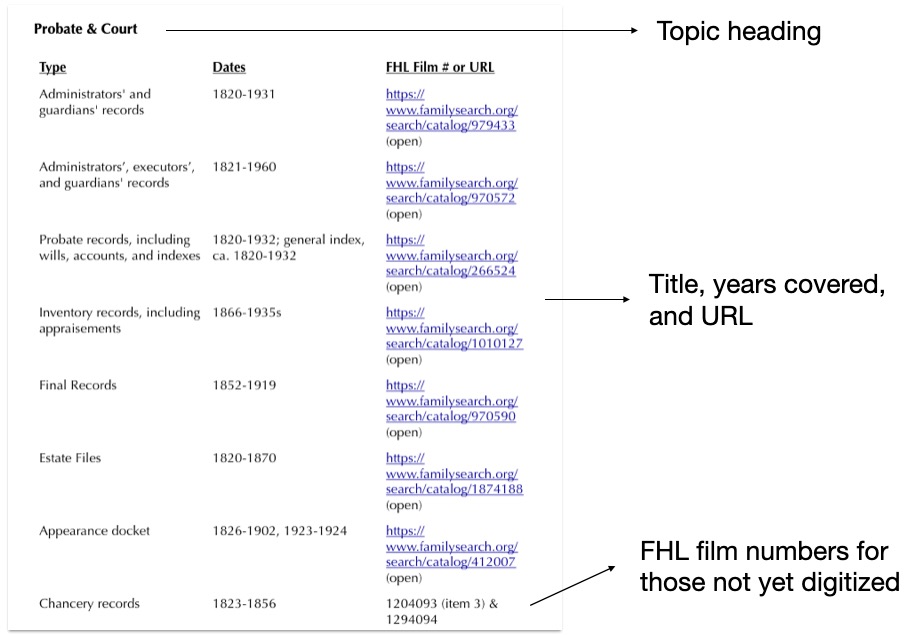
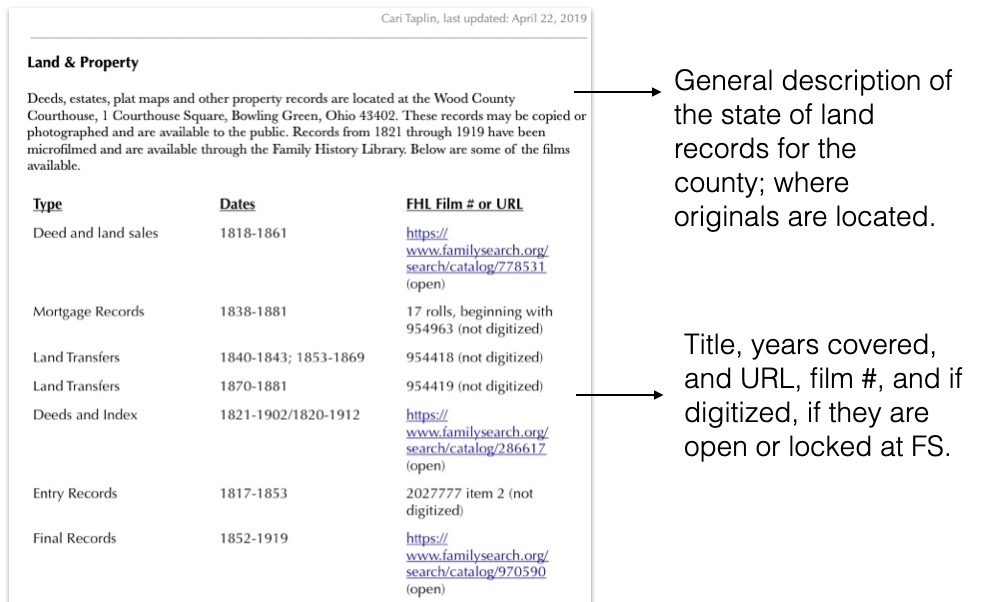
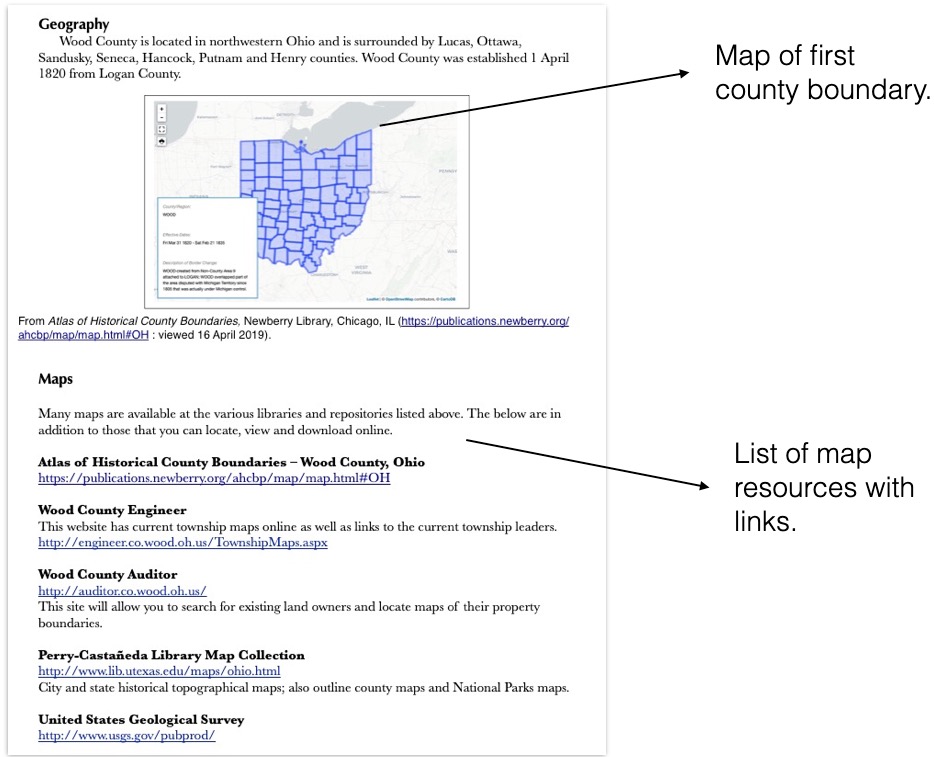
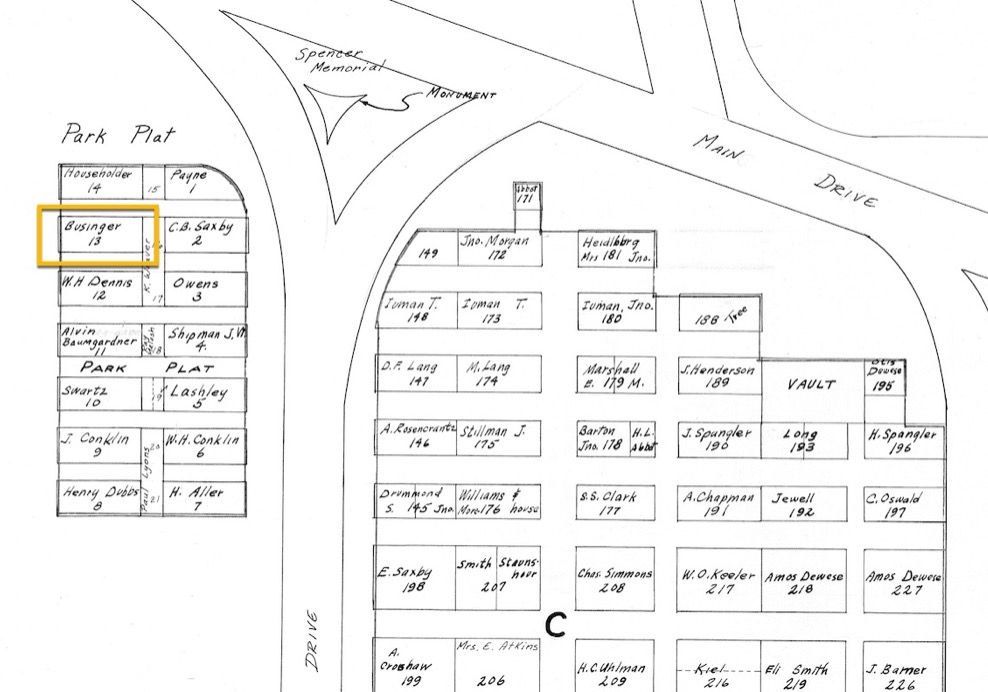
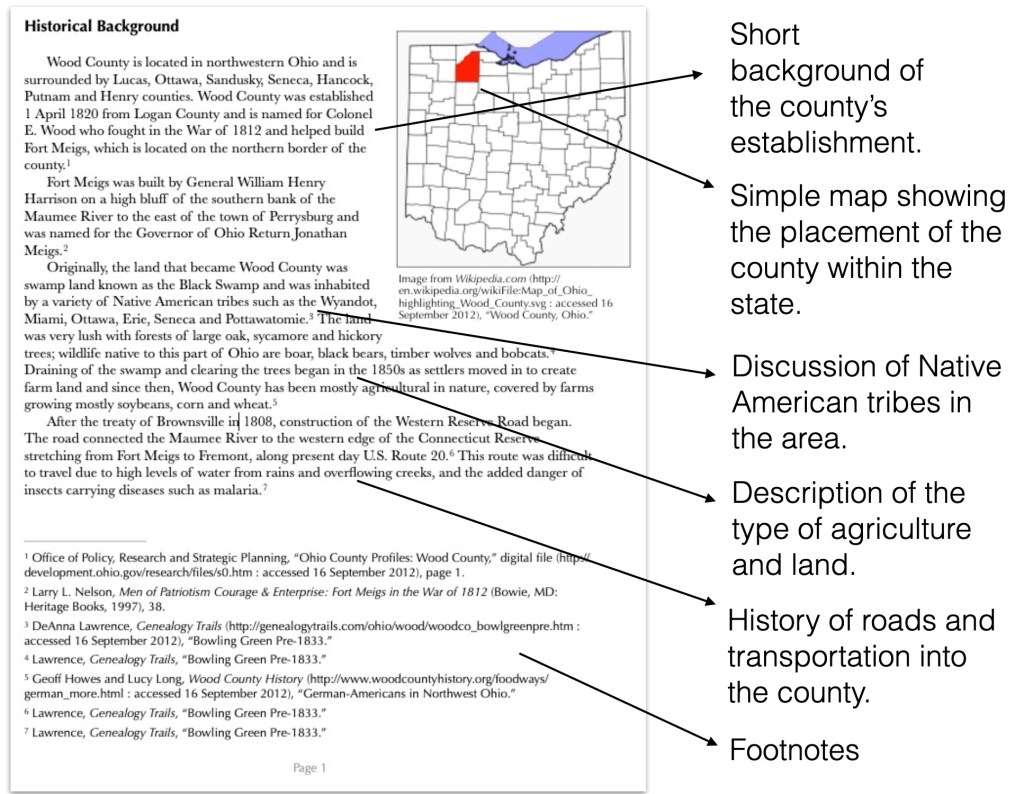
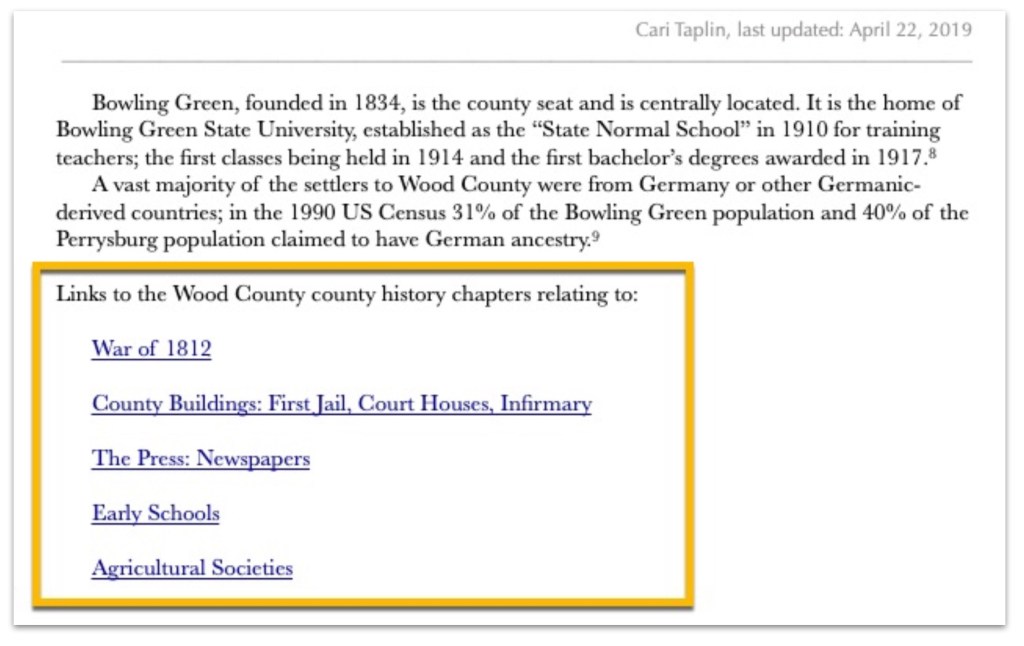
Second, utilize things that make your life easier in terms of creating your locality guide. I use a screen capture tool called “Snag-It” from TechSmith that not only takes screenshots but allows you to draw arrows, underline things, highlight, and put boxes or circles around important items. I use this to add visual aids to my locality guides as needed. Also, be sure to use active hyperlinks when adding links to your guide. This allows you to simply click and go to websites rather than having to cut and paste the links. Most programs can recognize a link and will make it active automatically. However, if that is not happening, usually if you highlight the link and then right click on it, you will get an option to add the hyperlink.

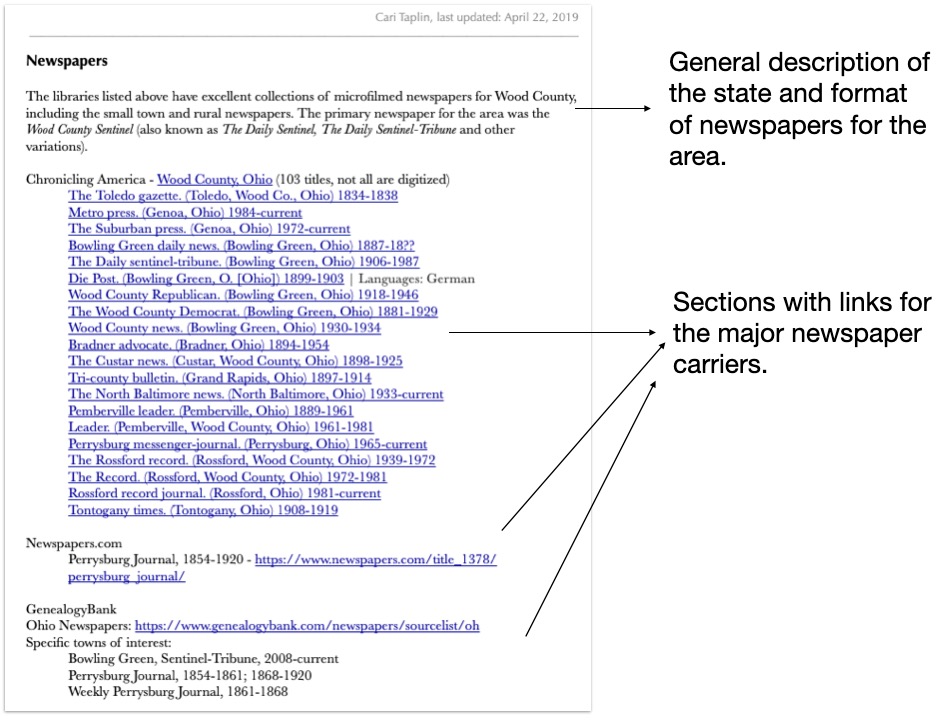
Third, make sure you are noting when the last time you updated the document. Sometimes, I work on my guides, then do the research project, and then the guide sits there for a year or two (or more) while I work on other things, and before I come back to it. It helps me to know how out of date that guide is. If it has been a long time, I might spend a half an hour making sure the links work, and updating what has been digitized at FamilySearch, and so on. I add the “last updated” date in my document’s header so that it shows up on every page.

Last updated example.

Here is a summary of the resources I use to build my guides:

  • Cyndi’s List
  • FamilySearch Wiki & Catalog
  • Map collections
  • University websites
  • Subscription sites
  • Google Books, Internet Archive
  • Specialized museums
  • Repositories and libraries
  • Local genealogical societies
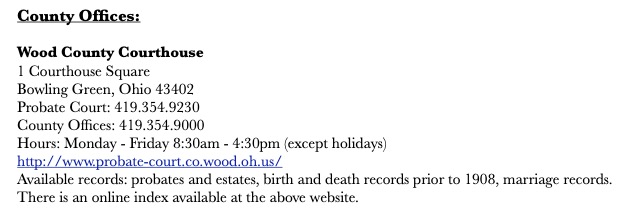
  • Government Websites (county courthouses, etc.)
  • Library of Congress
  • State historical or genealogical society
  • State archives
  • And so on…

Consider helping others with the information you gather for your guide. There are places you can share the information, especially if they don’t already have it! Consider submitting any new links to Cyndi’s List, updating the FamilySearch Wiki, or sending your completed guide as a PDF to the locality’s genealogical or historical society or local public library.

To wrap up, there is no right way to do this. You can create this any way that works for you in any format that works for you. You might use a word processor, a note-taking software such as Evernote, a spreadsheet, or paper and pencil! Your categories may be different than mine, the data you collect may be different, etc. It does not matter. The main point of a locality guide is to help you with the “pre-research” so that your research time is more efficient.

You never know where your genealogical research will take you. Creating a locality guide for each new area before you begin your research will save time in the long run by making your research more focused and making you more educated about the new location.

Update: This locality guide is for sale. Click here to order.

Building a Locality Guide: Repositories

Let’s discuss repositories in our Locality Guides. There are usually more than one that applies to a given geographical location, and often several. Adding this to your locality guide can help you plan research trips whether you go in person or work with an archivist or agent over the phone or email.

One section of my guide looks like this:

Example from my Wood County, Ohio locality guide.

I have sub-sections for courthouses, universities, local public libraries, genealogical and historical societies, local and regional museums, archival collections, and anything else that has a research facility that applies. In each, I include the name of the facility, their location, hours, contact information (including an email address if available), their website, a link directly to their catalog if applicable, and a short description of their holdings as it applies to my research and interests.

I’d like to share a tip for finding those repositories that you may have missed. I use Google Maps’s “nearby” function to find libraries, archives, universities, and museums in and nearby a town I am interested in. If you go to Google Maps, you typically put in a town or an address and click search. Then your location is shown on the map. If you look down on the right, there is a button labeled “nearby.”

Google Maps “Nearby” Button

Then you can type in “library” or “university” or any other search term (think hotel or restaurant if you are traveling).

Searching nearby for “library”

Next time, we are going to wrap up the series with a miscellany of items and tips that I use in my locality guides.

Building a Locality Guide: Published Sources

This section in my locality guide is basically a bibliography. However, I try to locate as many digital resources as possible so that I have a virtual “library” at my fingertips.

I like to put my bibliography in alphabetical order by author in traditional style, but you could also organize by topic. Again, do what makes the most sense to you.

Be sure to utilize a variety of sources to locate books for your guide. My favorites are (but are not limited to):

  • my own bookshelf
  • a public library in the local area of research
  • the FamilySearch Wiki
  • WorldCat
  • GoogleBooks, Hathi Trust, Internet Archive, FamilySearch Books, and other digital book repositories

I like to start by finding a county history, a modern history, genealogical guides for the area, and state or local genealogical publications and guides. The sky’s the limit here. I absolutely love a good bibliography!

Next week we will discuss repositories. In the meantime, have fun building a bibliography!

Building a Locality Guide: More on Records, Vital Records & Probate/Court Records

How and when vital records were recorded for a particular area varies by county and state. This is an important section to capture some of these nuances. Some questions I ask myself to help develop this section are:

  • What are my options for vital records for this town/county/state?
  • When did vital registration begin?
  • What county offices hold the records, if any?
  • What state offices are there that hold the records?
  • What is available at FamilySearch? At Ancestry? (etc.)
  • What is available at the state archives and state historical society?

Then I start Googling the state and county offices, looking at Cyndi’s List, checking the FamilySearch catalog and wiki, and so on. As I find the information I need, I build the guide. Here are some example sections for my Vital Records sections:

Example from my Wood County, Ohio Locality Guide.
Example from my Wyoming Locality Guide. I created a table for each county’s entry in the FamilySearch Catalog.

I follow a very similar system for finding the probate and court records for the area of focus.

Example from my Wood County, Ohio Locality Guide.

I also include a section providing more information on the county (or state) offices themselves:

Example from my Wood County, Ohio Locality Guide.

And you just keep building to your heart’s content. Next up, the section on published sources…

Building a Locality Guide: More on Records, Newspapers

The next section I include in my locality guide lists the newspapers available for a particular county. There are several ways I find this information.

  • Chronicling America – I utilize their “US Newspaper Directory, 1690-Present” to determine what newspapers existed for the area of focus.
  • Bowling Green State University’s LibGuide for “Finding Current and Historical Newspapers” – This list is for ALL newspapers, not just Ohio.
  • Examine the online catalog for the local library(ies) for the area of focus. They may have a list of what is available there either digitally or on microfilm.
  • Examine the state archives, state library, state historical society, and other state-level resources for newspaper availability.
  • Examine the catalogs of the online subscription sites such as Newspapers.com, GenealogyBank, Newspaper Archive, and Ancestry.
  • Utilize the FamilySearch Wiki and Cyndi’s List.

From these resources, I build a list of my own making in my locality guide, with live links and short descriptions. Here are some example sections:

Example from my Ohio Locality Guide.
Example from my Wood County, Ohio Locality Guide.
Example from my Wyoming Locality Guide.

Basically, just start building. When I start a new guide, I hit some of the basics, but then I add as I find more resources.

Next up, we will look at some more record types and how I include them in the guides.

Building a Locality Guide: More on Records, Land

We started the process of building the section on Records in my locality guide system. Let’s look at that in more detail. My main record sections include:

  • Land and Property
  • Newspapers
  • Vital Records
  • Probate and Court
  • Published Sources
  • and Miscellaneous (anything unique to the area that doesn’t fit in the previous categories)

You may decide you prefer other categories. That’s ok. This is just how I typically think about a new (to me) area that I’m researching.

For the land and property section, I typically do a few things before I get started. First, is this a state land state or a federal land state? (If you don’t know what those are, state lands were first owned by the state, mostly the original colonies, whereas federal land or public land were first owned by the federal government. See this map.)

Second, I determine what government office holds the deeds. Usually they are at the local county courthouse. I’ll note that entity’s address, hours, phone number, and website. I’ll also note if they are located offsite or at another facility. Some courthouses have moved some of their older records to research rooms or storage rooms and you may have to make an appointment to see them. Those details are noted in my locality guide in this section.

Third, I scan through the Family History Library Catalog for the particular county I’m working in, and noting all of the films they have. I note the title, the dates covered, and the film number. If the film has been digitized, I will give a link directly to the collection. I’ll also note if the digitized collections are open or locked (meaning you have to view it at a Family History Center or library.)

Example from my Wood County, Ohio locality guide.

I have not updated this guide since April 2019, and so you may find that some of the collections that say “not digitized” might now be.

We will look at the newspapers section next time.

Building a Locality Guide: Records

There are a couple of ways you can go about building this section, and I think it must follow the way you think about and do your research. Do you think about and do your research by location/repository or by topic (land records, etc.)? Depending on how you think about and conduct your research you may choose to organize this section by record type (and where to get them) or by repository (and what they have). I kind of do a combination of both. In this section, I organize by record type and then repository (or website within). Later, I have a section that we will look at on local repositories, and within that I give a synopsis of what each repository holds.

This section on records, includes six major sections. Depending on my needs or uniqueness of the area, this might be changed to fit those needs. However, in general, the sections are:

  • Land & property
  • Newspapers
  • Vital records
  • Probate & court
  • Published sources
  • Miscellaneous (records unique to the area)

One major item to note in this section is record losses. Be sure to note any major record losses, when they occurred, especially those pertaining to courthouse fires or other disasters in local repositories. This information can often be found on their county websites, at the local public library, the FamilySearch Wiki, and the local genealogical or historical society.

In the next post, we will look at the records sections in more detail.

Building a Locality Guide: Geography

The second section I like to include in my locality guides is a geography section. Nothing helps you understand a new location like maps do. So, my guides collect links to a variety of maps that depict various aspects of the locality that is the focus of the guide.

I either add the actual item, but more often a link to:

  • General county map indicating townships, towns, land divisions
  • Landowner or plat maps
  • Topographical maps
  • Town maps showing streets
  • Modern maps
Sample page from my Wood County, Ohio locality guide.

There are some great general map collections out there that you can use to find useful maps and links, such as:

But also, don’t forget to check for local sources. You may find digital maps at local public libraries, genealogical or historical societies, university collections, museums, county government office websites, and more. For example, in Wood County, Ohio, the County Engineer’s office has a variety of maps available on their website such as tax maps, township maps, cemeteries, ditch maps, plat maps, and many others.

Example of the cemetery map for Weston Cemetery in Wood County, Ohio, highlighting the Businger plots, my maternal ancestors.

Except for a general county map and possibly a township map, I mostly just collect the links to important maps rather than adding actual images to my locality guide. This saves space, primarily. However, if you want to include maps directly in your guide, you should feel free to do as much or as little as you like. Always do what works best for you!

Next week we will move on to the Records section of the guide.

Building a Locality Guide: Historical Background

Let’s dive into more specifics about the sections of my locality guide set-up. I like to include four major sections: Historical Background, Geography, Repositories, and Records. This week, let’s examine the historical background section.

This is not an all-inclusive list, and it may change depending on the specifics of the place I am working on, but I like to include the following in my “historical background” section:

  • Military actions, battles in the area that may have affected migration or records
  • Major ethnic and/or religious groups that settled in the area
  • Natural or man-made disasters that may have affected people, migration, and records
  • Native American influences and interactions
  • Types of industry or agriculture, what might have attracted people to live there
  • Laws, particularly those requiring record-keeping
  • Transportation routes

There are probably a thousand more topics that could be included here. But I’m not trying to make a whole new book with the locality guide. I’m building a resource that is “just enough” for me to remember important items, or point me to resources to learn more. In my guides, the above may be a sentence or a couple of bullet points, or a couple of paragraphs. It all depends on how detailed I feel like being, how useful I feel that information is going to be in a saved format like this, and how much time I have to spend on developing it. I don’t always have the time, so I might do bullet points with links to other resources.

Let’s look at a section of my guide I wrote for Wood County, Ohio.

A sample page from my locality guide on Wood County, Ohio.

I collect this information from books, articles, websites, and so on, and of course, a footnote is provided for that information. While this guide is normally just for my use, I often find myself wondering where I got a particular piece of information. Having a citation helps me find it again. If I ever share my guide with someone (a library, for example), it is basically ready to go.

The historical background section I try to keep to about a page. Like I said, I’m not writing the definitive work on a particular county. I’m simply trying to collect enough information for my own knowledge and use in research. If you want to collect more or less, that’s completely up to you. And sometimes a particular county might have a lot of history to it that you want to collect.

I mentioned that sometimes I will put in a list of bullet points with links rather than typing up a lot of narrative. Electronic systems allow you to add live hyperlinks to your text, so it is very easy to collect a links to add to your guide. The following shows a list of links to particular chapters in the county history for Wood County available on Google Books.

A sample page with hyperlinks to other resources.

Instead of writing up a bunch of information about specific events or topics, linking to those chapters in the county history available online allows me to save some time while also capturing resources for use later.

Next week we will go on to the geography section. In the meantime, pick a county (or other region) and perhaps start building the historical background section.

Building a Locality Guide: The Sections

Everyone is going to approach this differently than I do. But, if you’ve never built a locality guide, maybe some of my tactics will work for you or spur you to have new ideas that work for yours. This week, I’m going to discuss at a high level each of the sections I include in my guides. These are the four I use. You might choose a different four or a different arrangement, and that’s OK! The point is to build something that is going to be useful and helpful for your research.

My four sections are:

  1. Historical Background – major historical items of interest, especially those that might affect records, migration, and industry
  2. Geography – maps, maps, and maps; understanding the physical layout of a place helps understand ancestors
  3. Records – what major record sets are available, both online and off
  4. Repositories – what libraries, archives, museums, etc. are available for onsite research

I have found that over time these are the main sections I want to make sure I capture something about the new area I’m researching. Some guides are larger than others in these parts. It depends on several things such as how long am I going to be working in this new area? If it is for my own personal research or a long client project, I might spend a bit more time on this than I would for something smaller. Some areas just don’t have a lot of records due to them being a relatively newer area (Oklahoma or Washington state compared to Massachusetts for example). Or they sustained a lot of record loss, like some places in the south.

These four main sections form the basis of my locality guides. Next week, we will begin to break each section down and I will share examples from my Wood County, Ohio guide.