Category Archives: organization

Getting Organized: More on the Binders

I know last week I said we would talk about the digital side of my organization system, but I got a lot of questions and comments from the last post asking for more specifics about the binders. I thought I’d dig a little bit more into that this time.

I mentioned that each binder in MY system is focused on a couple and their children, EXCEPT that through which I’m descended through.

The binder organization is broken down like this:

Binder Map

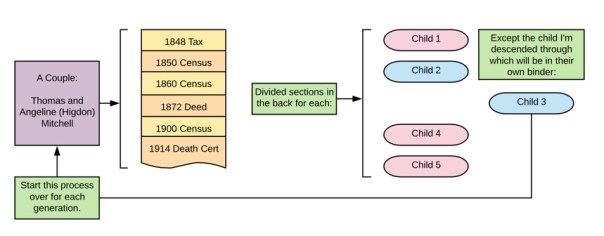
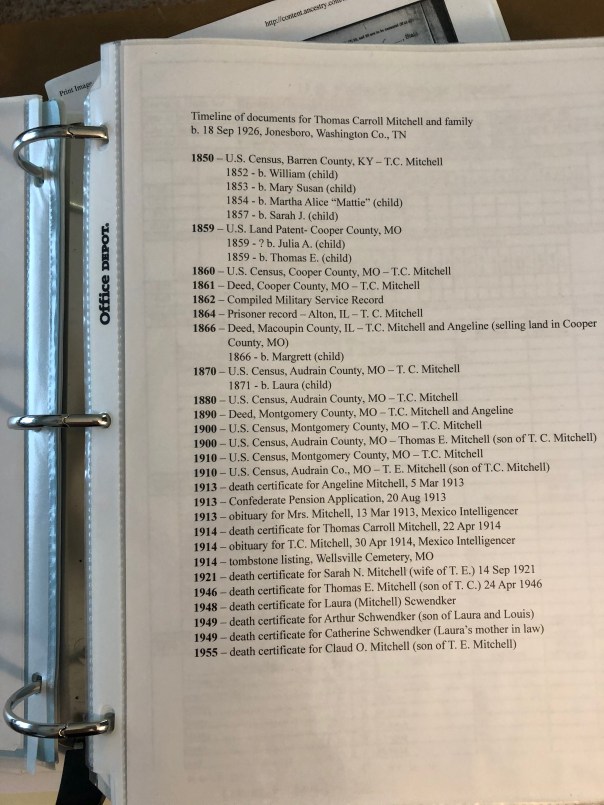
Each document is in chronological order, forming a visual timeline of their lives. In the back are divided sections for each of their children, except for the one who is my ancestor. They will have their own binder. Rinse and Repeat.

If you think of your pedigree chart, each couple is their own binder. The binder follows the pedigree chart. In the visualization below, each matching colored box represents one binder:

Binder pedigree

Now, as you move back in time, you may find you have fewer documents. For the couples that I do not have that much on (yet), I might put several generations in one binder until it gets too full and needs to be separated due to space issues. For those that I have done a ton of work on, I will get a 2″ or 3″ binder for their documents. Whatever size, I always make sure to get the kind with the clear slip-in fronts, backs, and spines. Then I clearly label what is in each binder.

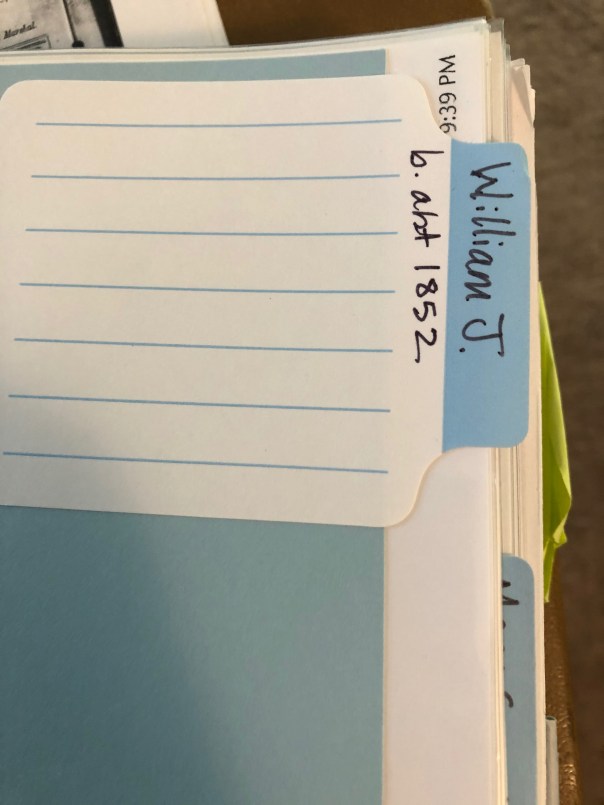
If for some reason, I do a lot of research on one of the children for a couple that is NOT my direct ancestor, they may get their own binder. In their parents’ binder, I will still include a divided section for them with a sticky note or piece of paper inserted telling me where their information can be located. I will mirror this information on the binder spine.

When discussing the binders, I often get asked about archival quality binders, paper, what do I do with my original documents, etc. MY system is not a system where I keep any original documents. Most of the time, I am obtaining photocopies of documents whether it be from a repository or downloaded from the internet. I am not preserving documents that cannot be obtained again. I have very few of those in my possession. What I do have, I have in archival boxes. Smaller items are in an archival folder my fire safe (I only have a small one) and larger items are in their archival folders but stored flat in a plastic box that will protect them from water damage. Now, if we have a massive fire or a major flooding event, I’m not delusional. I know that these methods may fail. If the worst does happen, I do have most of my materials digitized (even those that are irreplaceable) and backed-up on the cloud. (Like all good genealogists I know, a few projects are still waiting to be done.)

I hope this helps explain the binders and the system in more detail. Next week we will move on to the digitized aspect of MY system. I promise.

Getting Organized: My Binders

I promised photos in the last post, of my actual binders so you could see what I was referring to. I want to again reiterate that MY system may not work for you. You may think completely differently about organizing and how to locate your ancestors’ information in an efficient manner. You may not do paper at all. That is entirely ok. (I will not be offended if you skip these posts until I start talking about my digital files!)

Here is a view of the binder spines:

IMG_3939

The front of each binder has a family group sheet so I can see at a glance which family that binder holds:

IMG_3942

In each binder, I include a timeline of the documents that will be found inside. You can easily update this when you find a new document. (I personally will add them in by pen until I get several and then I will reprint it.):

IMG_3940

I have the children of this couple in the back of the binder, in chronological order, EXCEPT my direct line ancestor (the child I descend from). I create my own dividers with card stock and use sticky labels that you can write on:

IMG_3941

You might see colored sticky notes and other things sticking out if you examined my binders in detail. Those are generally items that are WIPs (works in progress). Those might be things I didn’t have time to write the citations for but I wanted to get it in the binder rather than put it in a stack. They might be items that need more research and the note indicates what that research might be. Primarily, they are there to get my attention next time I have time to work on them.

That’s basically it. Every document is “processed” (which we will go over that in another post), printed, put into the document timeline, put into a sleeve and put in its place in chronological order in the binder.

Next time we will go over the digital side of this. I mentioned before that I do both, paper and digital. I know it might be duplication of my effort, but it is what works for me. Again, DO WHAT WORKS FOR YOU. I can’t say that enough.

Getting Organized: Choose a System

First and foremost, you need to decide on YOUR system. Figure out what is going to work best for you. Do you think about your ancestors’ documents:

  • chronologically
  • by surname
  • by document type
  • by family group
  • alphabetically
  • by location
  • by event

There are many ways you can organize your papers. All that really matters is that it makes sense to you, that it is organized, that it preserves your documents, and you can find what you need in a reasonable amount of time.

I think of my ancestors in terms of the timeline of their life. I organize my files (both paper and digitally) chronologically by couple. I’m going to address my paper files first, we’ll look at my digital system in a later post. As I’ve expressed before, I’m a very tactile person. I like to read, organize, and think about my research on paper. It just makes more sense to me. So, I organize my research in binders. Each binder contains:

  • a family group sheet for the couple and their children
  • all of the documents for that couple’s life
  • separate section for each of the children (except for the one child I’m descended through), their documents in chronological order
  • a document timeline (like a table of contents that gets updated after I add new documents) – see image below

doctimeline

A question I usually get is: what about the husband or wife, where do their documents go? In my system, they go with their husband/wife, and not with their parents. I put an indicator page where they should go with a note to “see X binder.”

A few logistics: I typically use 1″ binders. However, there are some families I’ve done an absolute ton of work on that I have 2″ or 3″ binders for. There are some families that I have not done that much on yet; several generations of those families might be in one binder. I also use those white binders with plastic covers that allow you to slip paper down into. So, the front of the binder has the family group sheet, and I utilize the binder spine to label the binder for which couple (birth and death dates) and their children. I also note on the spine something like “except William Long, see Binder X” or something like that to tell me at a glance which binder I need.

The next post will have more photos of my actual binders and discuss some other organizational logistics as it relates to paper.

Thanks for reading!

Getting Organized: Paper or Digital?

The first post in this series last week garnered some comments on the post itself or on my Facebook page relating to digitizing your files. Some are completely paper free which is great. Others still like paper. I say there’s no superior system. The only superior system is the one that is working for YOU. So if paper makes more sense to you, then keep your files on paper. If you cannot stand the clutter, then perhaps a digitized system is yours. Personally, I use both.

I grew up in a world before the Internet (it seems so long ago) and I struggle to really connect with my ancestors when “they” (their documents) are entirely digital. My paper system organizes their documents in chronological order so that when I am looking through a person’s binder, I have a visual timeline of their life, at least in terms of the documents they left behind. (We’ll cover this in more detail in a later post.)

Before you can organize paper or digital, you have to decide HOW you’re going to organize. Find a system that makes sense to you. Spend some time thinking about how you think about your ancestors, their documents, accessing their documents, and so on. You’ll want to match your filing in a way that matches how you think about the documents. The possibilities are endless! Here are a few ideas:

  • by surname
  • by location
  • by family line
  • by event (marriages, deaths)
  • alphabetically
  • by document type/repositoryStay Tuned TV
  • chronological order

Or a combination of any of the above.

As I mentioned, I organize my documents in chronological order. It’s more detailed than that, and it is the subject of the next post so stay tuned!

Getting Organized: What’s Your Goal?

I’m moving from tech tools for being organized to actual organizational tips and systems for our genealogy (research, notes, files, and more). I’ve always worked on the principle that if you can’t find something in less than a minute, your system is not working.

If you are like me, you are busy and there are never enough hours in the day! Being organized is a key component to getting the most out of our time. Consider the following:

  • You should be able to find your documents in a short period of time. If you can’t find what you are looking for quickly, then your system isn’t working.
  • Your system should be understandable to others. What will happen to your work if someone else has to take over?
  • Your system should preserve your documents. You don’t want your descendants (or whomever takes over for you) to have to relocate all of the same documents.
  • Your system should reflect your purpose for your research. Ask yourself, “What is my goal?” and “What am I going to do with my stuff?”

In this series, I’m going to discuss some of these thoughts as they pertain to my own system, share with you some of the ways I keep organized, tips on research plans/logs (or “plogs” as I call them), and so on.

I’m hoping that the act of writing up this series will also help me get organized again. I’ve let it slide lately because I’ve been so busy! Stay tuned for some excellent tips and thoughts on getting organized!

An actual view of my desk today. Yikes!

Prepping for Institutes Digitally

I am heading off to Georgia to attend the Institute of Genealogical and Historical Research (IGHR). I am excited to finally take the writing course from Tom Jones, “Course 4: Writing and Publishing for Genealogists.” This has been on my educational “to do list” for years and I’m finally getting to it!

These days, we are saying good-bye to paper more and more. Don’t get me wrong, I LOVE PAPER. Ask any of my students, discussion group attendees, family, or friends. I still print all of my research documents and organize them into binders. I also like taking handwritten notes. However, those institute binders really add up and for many of us, space is at a premium. Plus, it keeps the costs down if an institute doesn’t have to pay to print and organize all of those syllabi. Of course, you can still usually buy a printed syllabus or print it on your own. And if you do, do not worry! I’m not here to be down on anyone’s system. However, in order to use less paper, and utilize the electronic syllabi more effectively, I have come up with a system that works for me. Maybe you’ll find something in here that can work for you too.

Before I go to any institute, there is an amount of prep-work I do with the digital syllabus so I’m organized and ready to take notes. I utilize a combination of a PDF-splitter and Evernote. What I mean by a “PDF-splitter” is using a bit of software to make one large PDF into several small PDFs. I believe the full version of Adobe Acrobat will do this (but I don’t use it so do some research first), as will several other programs. I use a Mac and have found “PDF Toolkit+” to meet all of my needs. It has a lot of features, but today I’m focusing on the “split/extract pages” portion of the software.

pdfsplitter
Screenshot of PDF Toolkit+ with a range of pages to be extracted.

Basically, I sit down with the class schedule, the large PDF, the PDF-splitter, and Evernote. Using the splitter, I extract the pages for each class and then create their own note in Evernote, dropping in just that portion of the PDF. This allows me to have each the syllabus material for each class split out into one small file. Then I can type my notes into each note or take handwritten notes on paper to scan/type in later (they say the brain retains information better when you take notes by hand). Evernote also has tools that allow you to highlight, add symbols, draw, or take notes directly on the PDF.

markup
Just an example of some of the ways you can mark up the PDF using Evernote’s tools.

I organize these notes into a new Evernote notebook titled appropriately for the institute I’m attending. You can organize them in whatever way works best for you. I number them according to the order they should be taught based on the class schedule. See my example below.

EvernoteSetup
On the left is the list of notebooks from all institutes I’ve ever attended (and added to Evernote), IGHR 2018 is highlighted. In the middle are the thumbnails of each individual note in the highlighted notebook, numbered according to class order. On the right is the full view of the note with the PDF dropped in.

As the week moves on, I open the note for the appropriate class, and either use the syllabus visually and then take handwritten notes or I type my notes above the PDF. I take handwritten notes most of the time for the reasons already mentioned) but I do also use the mark-up tools available as well, especially if I don’t want to forget something in particular mentioned in the syllabus. Often, it just depends on how I feel when I get up in the morning. Evernote notes are word searchable, and there is a tagging system to help you be organized as well.

The most important thing is that you find a system that works for you. If digitized notes and syllabi are not for you, I hear you! It really has taken me a long time to get to this point…and I’m not completely digital myself and probably never will be. But, to save on costs and space, this is one of my systems for eliminating paper.