Monthly Archives: November 2019

Getting Organized: The Digital Side

I’ve been going on and on about my binder organization methods for several weeks now. What about my digital organization? There are a couple of aspects that I will cover over a few posts, primarily: files on my computer and scanning/digitizing tips. This week, I’ll address how I organize my digital files so they match my binders (more or less).

I must admit that I did not come up with this idea on my own. We all stand on the shoulders of those who have figured things out before us. Every time you attend a lecture, an institute, a webinar, you learn something new, even if you thought you knew everything there was to know about a topic. At the Salt Lake Institute of Genealogy‘s (SLIG) first “Tech Day,” I attended a class by Cyndi Ingle (that famous lady from Cyndi’s List! and who is one of the moderators for the Facebook Group “The Genealogy Squad“) and learned a method that would allow my digital files to mirror what I had already created in my binders.

My binders are in chronological order. I don’t know why I hadn’t come up with a method on my own yet, but I hadn’t. I took Cyndi’s class “Coordinating the Cloud” which was about many technical topics, but the biggest takeaway for me was a file-naming system that I adopted for my digital files. (THANK YOU, CYNDI!) Basically, you can name your digital files in such a way that it will match your binders. Now, this might be a big “duh,” but for me, it was “a-ha!” I just hadn’t realized it yet. There are those moments when something should be so obvious but it isn’t for some reason. This was one of those moments.

So the file naming system goes like this:

YEAR-SURNAME FIRSTNAME – code or description of the document.jpg (or whatever file type it is)

For example:

  • 1850-HIGDON Joseph – census.jpg
  • 1853-HIGDON Joseph & RENFRO Malinda – MR.jpg   (marriage record)

And in my finder it looks like this:

DigitalBinders

Because of the way computers organize files, numbers come before letters. So by putting the year first, those files come before the children, just like my binders. You can choose some style things. I typically like to have the surname in all caps, it is just easier for my eye to land on it, however, in this example, you can see my inconsistency. It happens. Someday when I really want to procrastinate I’ll work on fixing these things.

If you have documents in the same year, you can put a month number (and a day if you wish) after the year and it will sort appropriately: 1851-06-15-HIGDON-Census.jpg. I currently use a, b, c, but may change my mind later if I get a lot of documents in the same year.

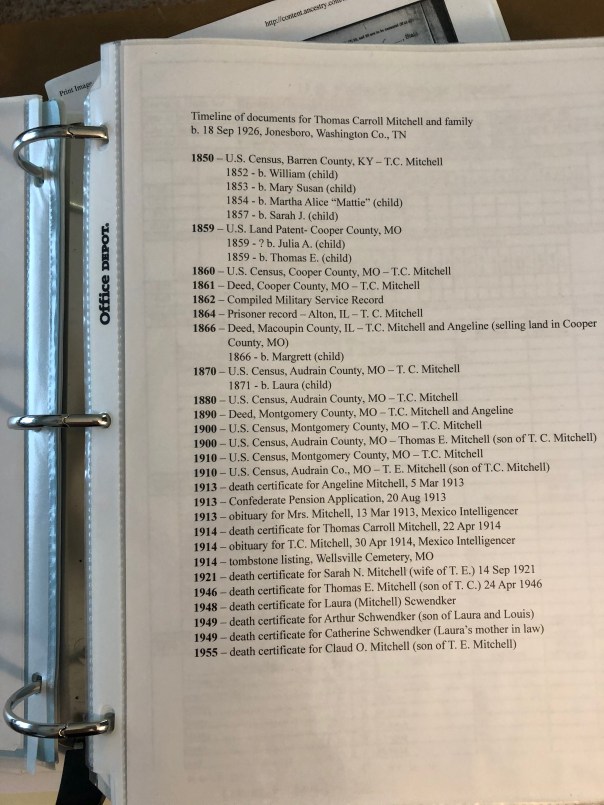
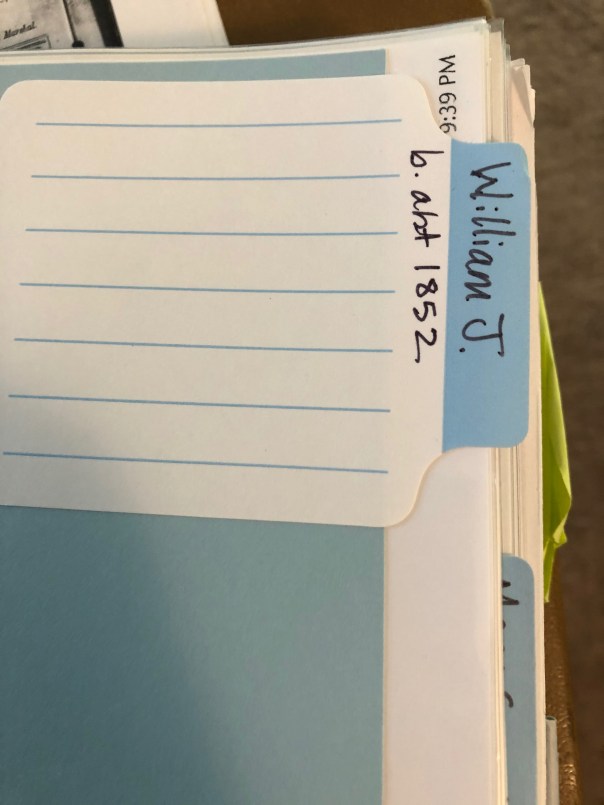
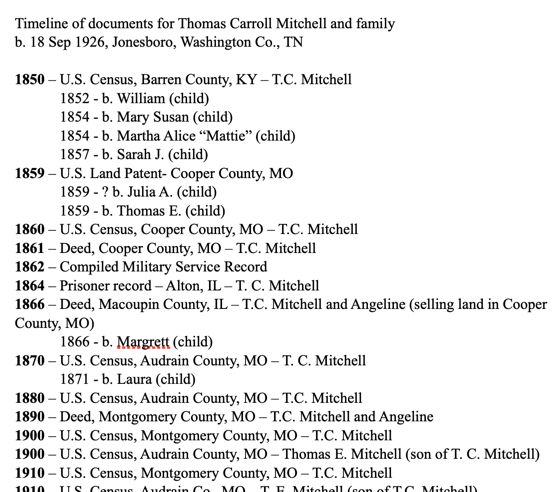
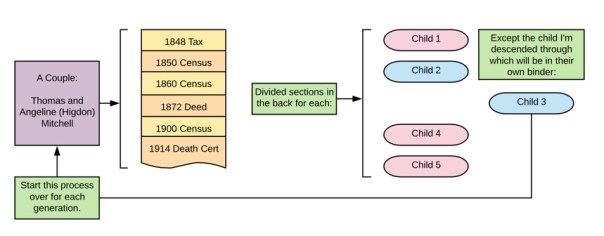
If you remember, my binders are organized by each couple and their children except the child I’m descended through. You can see in the image above that the child I’m descended through has a note in the folder name indicating where I will find that child’s information. The rest of the children have their own sub-folder and they are ordered by birth order using the notation “(ch#)” in the file name.

The eagle-eyed among you may have noticed some files with “wcit” in the filename. That is a duplicate of the image, usually, that has been copied into a word processing file (in my case I use Mac Pages, but you can use whichever software you desire). To that image, I’ve added a text box with the citation to the page to provide “separation safeguards” which prevent separation of an image from its source (citation) information.1 I want to save both the original and the citation-treated images in my digital folder.

This is a work in progress. I didn’t sit down and fix all of my digital files as soon as I learned this naming convention. (Who has the time?) I fix it as I work on various projects in my family. One of the things about getting organized is that it doesn’t happen overnight or in one session of organizing. Make a commitment to work on it 15 minutes a day, or an hour a week, or whatever timeframe works in your schedule.

But most of all, get started! And keep learning!


1. See standard number 8, “Separation Safeguards” in Board for Certification of Genealogists, Genealogy Standards, 2nd ed. (Nashville: Ancestry.com, 2019).

Getting Organized: More on the Binders

I know last week I said we would talk about the digital side of my organization system, but I got a lot of questions and comments from the last post asking for more specifics about the binders. I thought I’d dig a little bit more into that this time.

I mentioned that each binder in MY system is focused on a couple and their children, EXCEPT that through which I’m descended through.

The binder organization is broken down like this:

Binder Map

Each document is in chronological order, forming a visual timeline of their lives. In the back are divided sections for each of their children, except for the one who is my ancestor. They will have their own binder. Rinse and Repeat.

If you think of your pedigree chart, each couple is their own binder. The binder follows the pedigree chart. In the visualization below, each matching colored box represents one binder:

Binder pedigree

Now, as you move back in time, you may find you have fewer documents. For the couples that I do not have that much on (yet), I might put several generations in one binder until it gets too full and needs to be separated due to space issues. For those that I have done a ton of work on, I will get a 2″ or 3″ binder for their documents. Whatever size, I always make sure to get the kind with the clear slip-in fronts, backs, and spines. Then I clearly label what is in each binder.

If for some reason, I do a lot of research on one of the children for a couple that is NOT my direct ancestor, they may get their own binder. In their parents’ binder, I will still include a divided section for them with a sticky note or piece of paper inserted telling me where their information can be located. I will mirror this information on the binder spine.

When discussing the binders, I often get asked about archival quality binders, paper, what do I do with my original documents, etc. MY system is not a system where I keep any original documents. Most of the time, I am obtaining photocopies of documents whether it be from a repository or downloaded from the internet. I am not preserving documents that cannot be obtained again. I have very few of those in my possession. What I do have, I have in archival boxes. Smaller items are in an archival folder my fire safe (I only have a small one) and larger items are in their archival folders but stored flat in a plastic box that will protect them from water damage. Now, if we have a massive fire or a major flooding event, I’m not delusional. I know that these methods may fail. If the worst does happen, I do have most of my materials digitized (even those that are irreplaceable) and backed-up on the cloud. (Like all good genealogists I know, a few projects are still waiting to be done.)

I hope this helps explain the binders and the system in more detail. Next week we will move on to the digitized aspect of MY system. I promise.

Announcing NEW NGSQ Study Groups

During my time as a facilitator for the Certification Discussion Groups (CDG), organized by Jill Morelli, students indicated to me that they wished for some more options in discussion groups to talk more about the “meaty” techniques and methods of genealogical research, particularly when working with evidence analysis and the Genealogical Proof Standard.

IMG_3953I’ve been thinking about doing this for a while and have finally settled upon the details. This is a monthly study group that will examine one National Genealogical Society Quarterly (NGSQ) journal article per month. We will study these articles with a focus on principles taught in Mastering Genealogical Proof (MGP) by Tom Jones. We will discuss topics on the genealogy standards, evidence analysis and correlation, writing, citations, and more.

The cost is $50 for the year. For this price, you will:

  • Participate in a monthly study group session for up to two hours with your peers, led by me, Cari Taplin.
  • Receive the discussion questions at least two weeks prior to the online meeting.
  • Have access to a private Facebook Group for mid-month discussion. This Facebook group will be limited to study group participants only, no outside noise!

There will be no individual feedback given unless you want to sign up for a private consultation session. There will be no required peer feedback, except for what you choose to post and receive in the FB group. Your commitment is to read the articles, any indicated sections in MGP, and come prepared to discuss the questions (or simply show up and listen). I believe the benefit you will get out of a class is equal to the effort you put into it.

Please Note: You must have access to these articles either by being a member of NGS or from your local library. You will also need to have a copy of Mastering Genealogical Proof. Due to copyright, I cannot provide copies to you.

There are three sessions, two daytime and one evening.

Sign up now or click for more information.

This is meant to be an INTERMEDIATE discussion group, not a beginner or advanced. If you aren’t sure if you fall into that category here are some possibly helpful descriptors to help you decide (all or none could apply but this is the type of group I’m aiming for):

  • You’ve read NGSQ articles and generally can follow them (I’m not asking if you fully understand them, but they aren’t “Greek” to you either)
  • You own Mastering Genealogical Proof(or at least know what it is and will buy a copy before this class starts)
  • You own or have access to a copy of Evidence Explained by Elizabeth Shown Mills
  • You’re interested in certification or accreditation and have participated in one of Jill Morelli’s Certification Discussion Groups (CDG)
  • You know what the Genealogical Proof Standard is.

If you aren’t sure, send me an email and we can discuss it further.

To keep the discussion manageable and allow everyone a chance to speak, class size is limited to 25 participants, so sign up now!

I’m looking forward to studying with you!

Getting Organized: My Binders

I promised photos in the last post, of my actual binders so you could see what I was referring to. I want to again reiterate that MY system may not work for you. You may think completely differently about organizing and how to locate your ancestors’ information in an efficient manner. You may not do paper at all. That is entirely ok. (I will not be offended if you skip these posts until I start talking about my digital files!)

Here is a view of the binder spines:

IMG_3939

The front of each binder has a family group sheet so I can see at a glance which family that binder holds:

IMG_3942

In each binder, I include a timeline of the documents that will be found inside. You can easily update this when you find a new document. (I personally will add them in by pen until I get several and then I will reprint it.):

IMG_3940

I have the children of this couple in the back of the binder, in chronological order, EXCEPT my direct line ancestor (the child I descend from). I create my own dividers with card stock and use sticky labels that you can write on:

IMG_3941

You might see colored sticky notes and other things sticking out if you examined my binders in detail. Those are generally items that are WIPs (works in progress). Those might be things I didn’t have time to write the citations for but I wanted to get it in the binder rather than put it in a stack. They might be items that need more research and the note indicates what that research might be. Primarily, they are there to get my attention next time I have time to work on them.

That’s basically it. Every document is “processed” (which we will go over that in another post), printed, put into the document timeline, put into a sleeve and put in its place in chronological order in the binder.

Next time we will go over the digital side of this. I mentioned before that I do both, paper and digital. I know it might be duplication of my effort, but it is what works for me. Again, DO WHAT WORKS FOR YOU. I can’t say that enough.

Getting Organized: Choose a System

First and foremost, you need to decide on YOUR system. Figure out what is going to work best for you. Do you think about your ancestors’ documents:

  • chronologically
  • by surname
  • by document type
  • by family group
  • alphabetically
  • by location
  • by event

There are many ways you can organize your papers. All that really matters is that it makes sense to you, that it is organized, that it preserves your documents, and you can find what you need in a reasonable amount of time.

I think of my ancestors in terms of the timeline of their life. I organize my files (both paper and digitally) chronologically by couple. I’m going to address my paper files first, we’ll look at my digital system in a later post. As I’ve expressed before, I’m a very tactile person. I like to read, organize, and think about my research on paper. It just makes more sense to me. So, I organize my research in binders. Each binder contains:

  • a family group sheet for the couple and their children
  • all of the documents for that couple’s life
  • separate section for each of the children (except for the one child I’m descended through), their documents in chronological order
  • a document timeline (like a table of contents that gets updated after I add new documents) – see image below

doctimeline

A question I usually get is: what about the husband or wife, where do their documents go? In my system, they go with their husband/wife, and not with their parents. I put an indicator page where they should go with a note to “see X binder.”

A few logistics: I typically use 1″ binders. However, there are some families I’ve done an absolute ton of work on that I have 2″ or 3″ binders for. There are some families that I have not done that much on yet; several generations of those families might be in one binder. I also use those white binders with plastic covers that allow you to slip paper down into. So, the front of the binder has the family group sheet, and I utilize the binder spine to label the binder for which couple (birth and death dates) and their children. I also note on the spine something like “except William Long, see Binder X” or something like that to tell me at a glance which binder I need.

The next post will have more photos of my actual binders and discuss some other organizational logistics as it relates to paper.

Thanks for reading!